Friday, 25 November 2011

A warehouse, a trout and a 121

I have returned to Devon at long last, and thank goodness for that. Working away from home can be fun, but I definitely get homesick if I am away for too long. Getting home has meant that I have progressed a little on a couple of projects.


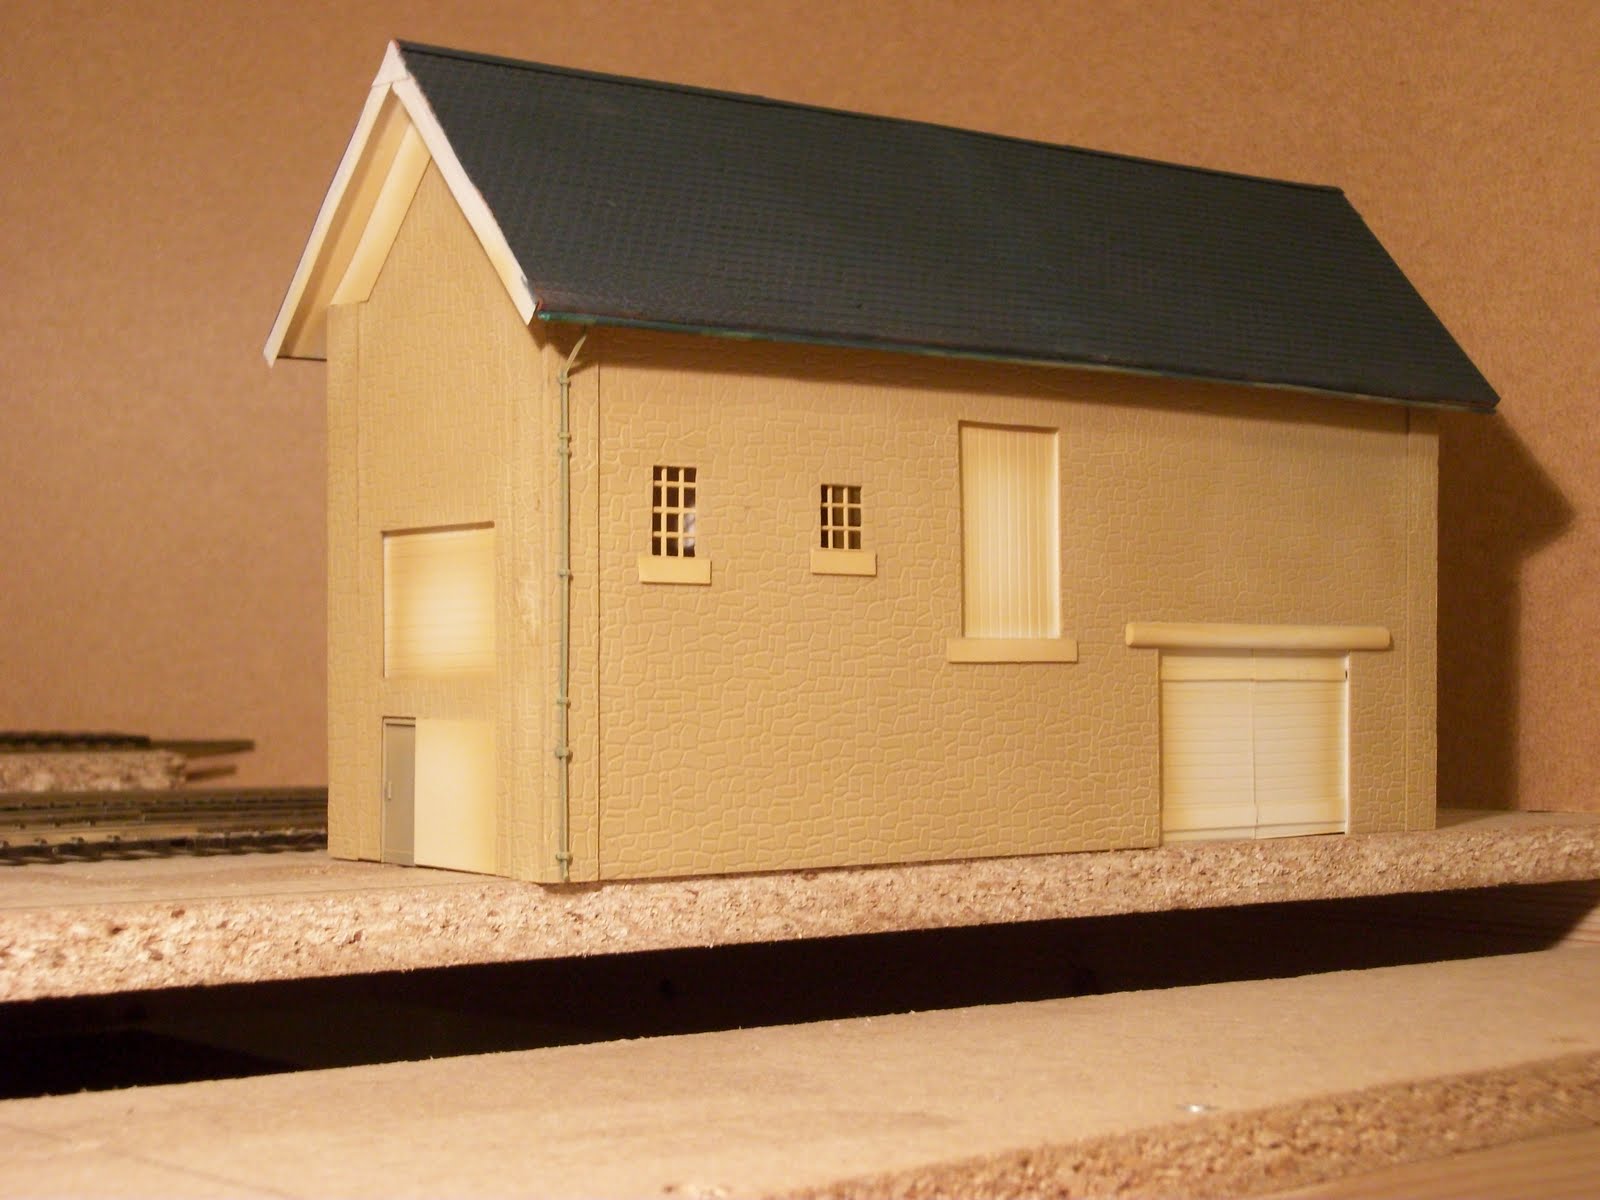
First coats of paint on the Pottington Quay warehouse

The warehouse for Potting Quay has advanced a little bit, with some coats of paint applied. This is by no means finished, but is starting to resemble a passable representation of a dockside warehouse. The stones have been given a base-coat of yellow/brown, and the roof slates a dark grey. There are a few (many!!) imperfections noted on the body work, so a bit of selective filing and the like is required to finish off the body. However, it is starting to shape up. It is by no means perfect, but I am enjoying the process of making it.

On the theme of Pottington Quay, after seeing a great video of a blue warship hauling about 6 mk1s over the north Devon railway to Ilfracombe in 1970, I have decided that the upcoming Pottington Quay has to have a through running single branchline. I know I change my mind everyday, but Pottington is set between Barnstaple Town and Braunton, so I can imagine that the line was preserved. The other consequence of this is a warship has been added to my shopping list for the layout!!

All the projects I have on the go at the moment are slightly longer term and require more time than I can currently spend on playing trains. As a consequence I decided I need a quick project, one I could finish in a day or two, or certainly within a week. So I have taken the couplings off the departmental trout wagon I recently purchased and added some 3 link couplings. In common with most rolling stock now adays, this simple coupling conversion is quite a hassle, having to remove a considerable amount of plastic from the underframe, including the plastic housing for the screw that holds the tension lock coupler in place.


Trout ready for weathering

After removing a few of the screws I considered taking the trout wagon apart. Having the hopper separated from the body would certainly aid painting, but it seemed something of a riddle and I felt certain I would damage it, if I tried. So for simplicities sake I left the wagon whole and went about cutting away the parts of the plastic underframe, to accommodate a 3 link coupling. I also scuffed up the finish on the hopper using a fibre glass pencil, to promote some uneven colouring on the body. It is subtle, but it is visible. The wagon is is now ready for washing and then weathering. I hope to finish this off with a couple of evenings modelling next week.

The other project I made a little headway on is my class 121 detailing. Some of the front detail was added and the chassis was completely separated from the motor unit. When all the detail is added I will weather the chassis and bogies before installing working lights into the DMU body. I might go for the express models kit for this, although I currently have a blackcat kit for the DMU lighting. My aim is to get this and the class 119 in service by xmas, but that is less than a month away, so we shall see....


Detailing on the class 121

Sunday, 20 November 2011

Beeching cuts and some video of Barnstaple to Ilfracombe

I have had to spend the week in York again. This has meant very little time for anything other than work, except for the odd hour here and there. Whilst I have achieved no modelling, I have spent some time doing some internet research/reading, primarily on the Beeching cuts. I was born after the cuts, but I have had to live with the consequences of them, especially in North Devon, where the extent of the cuts can only be described as savage. I used to have to drive for 6 miles to catch the train to Exeter for work each day, whereas the old railway station was c. 300m from my house!! And I live a lot closer than most in Devon to a railway station.

Hindsight is a wonderful thing and each generation has its own ideas. However, in my view the railway cuts of the 1960's can now be seen to be shortsighted, unstrategic and in many ways now hinders the re-expansion of the network. In the 1960s cars were seen as the answer, and environmental factors such as particulate pollution, noise pollution, social well being, economic decline of severed communities, carbon dioxide emissions, traffic congestion and population growth were not even considered in the economies of the time. And in the case of Devon I wonder whether towns like Bideford and Torrington will ever see rail services again, I hope so.

Anyway, whilst trailing through the internet I found several cracking videos of the North Devon line. My favourite shows a rake of mk1s behind a warship travelling through Barnstaple Junction, Barnstaple Town, Braunton and ending in Ilfracombe, just a couple of days before the line closed for good. The fact the 'branchline' had about 5 mk1s and clearly plenty of passengers, shows the fool-hardiness of closing the line. I guess this line will never be reinstated now, due to having cross the River Taw at Barnstaple, and also the selling of some of the land at Barnstaple Town station and Braunton, and the Ilfracombe station site. Now one can imagine the line to be a key development route in the southwest, and a real tourist attraction, if only it still existed. Anyway, that is not the case, but of course in modelling terms it still exists in my imagination!!

Hopefully I will be back to some normal modelling later this week, - I am looking forward to getting home. Until then please have a look at the videos if you have any interest in the railways of Devon, they are well worth a watch .

http://youtu.be/djcVdpr7Vx8
http://youtu.be/3V_FMj66b1k
http://youtu.be/RW-Nkjrjo_c

Saturday, 12 November 2011

Another building for Pottington quay


A second simple building for Pottington Quay

Another quick update, which again highlights an almost complete lack of modelling at the moment. Another week was spent working long days away from home and this left very little spare time each evening. I am also returning to York this week, so again there will be little time for any modelling. This is the joy of several work projects starting close together, leaving no time for a life outside of work. However, I am hoping that when pay day arrives I might be able to afford a couple of new sound locos for Pottington Quay...


The model is going to being finished in a semi-derelict state

A little project that did receive some attention was a little semi-industrial farm out building. This is my second scratchbuilt structure for Pottington Quay. Whilst this is not a difficult structure to make, it is better than my first attempt at the warehouse, currently in the paintshop. I have certainly got the bug for constructing original buildings, although my skills are not quite there yet!! I am going to try a fibre board/DAS modelling clay building soon and also build derelict farm house to go with the outbuilding I have just made.

One of the benefits/time wasting activities with working away from home is doing a little bit of research on the internet on modelling, etc. One of the things I want to improve on Pottington Quay is my track soldering. Scanning around the internet has revealed numerous videos, some of which to be frank are speaking utter twaddle. I am no expert modeller, but it made me realise that the internet whilst being a wealth of data, it can also be misleading.....

The other thing that has caught my eye this week is a Branor truck cam. This has gone straight on the top of my current shopping list. I have been looking for a product like this for a while and think this is a great idea. Amongst other things I am also planning to installl a small camera into the layout to real time record video and hook directly to a laptop, which will be placed to the side of the layout. But before I get too far ahead of myself, I need to get the buildings constructed and the track laid, which will be a couple of weeks at least until I get home again.

Sunday, 6 November 2011

Tunny wagon

I have spent most of the week away in York, very enjoyable, but no further progress on Pottington Quay. I am waiting for the next 4 weeks to pass, until I can really get stuck into the building of the micro layout. Until then I am contenting myself with the odd bit of kit building or scratch building.


Tunny ready for the paintshop

I have recently finished building a Chivers Finelines Tunny. This is the SR version and is a gem of kit. It is very straight forward to build and looks great. It is another wagon to be added to my growing list of engineering stock. I have some more tunny wagons, lampreys, a crab and a grampus to build, many before xmas. However, I am still waiting on the transfers for the kit, the same as for the crab, the lamprey and the whale. Modelmaster decals have apparently had all sorts of supply issues. I can only hope these issues are resolved soon - it is really frustrating to have lots of part finished engineering wagons. However, I am coming to the conclusion that the ideal layout for me will have to be an engineering depot!!


The other little task I have made some limited progress on is another building to add to Pottington Quay. I am hoping it will look like a kind of derelict old farm building converted to some semi-industrial use. We shall see, if I make any progress on the building this week I shall put up a few pictures.

Friday, 28 October 2011

Engineering PMV and CCT wagons


The CCT (furthest away) and PMV (closest) left at Amberleigh Halt, on what appears to be fine summers evening sunset (or just bad lighting!!!)

This week has seen much progress on the wagon front, not least the finishing of two models, the southern CCT and southern PMV, modelled in 1970/1980s departmental liveries. Although enjoyable projects, both of these wagons had flaws from my limited modelling - I have always maintained this a blog about my experiences of modelling - and these two wagons fit that bill perfectly!


The finished PMV, I am still not happy with the glazing though

On each of the wagons I had niggles with the finishes. On the CCT QPV staff Tool wagon I was less that impressed with my finish on the transfers. With the PMV I really messed up the glazing! So on both wagons I was 90% happy but that 10% really niggled me.


An attempt to rescue to the original glazing effort, using glue and glaze. A good lesson that if you rush things, it will show up

With the PMV I put a layer of glue and glaze over the windows and let this set before weathering the wagon. This did a lot to disguise the poor first attempt at glazing. This wagon was always destined for a heavily weathered finish, so these two factors I was hoping would make for an acceptable finish. The photographs show whether this has succeeded; the glazing is certainly better, but not perfect. I am now 95% happy, although there are still niggles with the PMV, such as a wonky hand rail, etc! I think that it is one of those projects I will live with, until I get around to replacing it - which will probably be in a decade or so!!


The heavier weather finish on the PMV

With the CCT I really only wanted to disguise the poor finish on the transfers using some subtle weathering. This I hope has been achieved. The CCT (now a QPV tool wagon) I was always happier with. I think that the weathering job has succeeded in blending in these transfer elements, so this one can stay!!


The CCT with the lighter weathered finish

Recently I took down my DCC test track (Amberleigh) and put this into storage. I realised that this is a bad idea - as I now have nowhere set up to photograph finished/developing models. So I balanced Amberleigh up on some trestles to take these photographs last night and held a lamp in one hand and the camera in the other. Needless to say it was all a bit make shift and as the result the photographs are pretty rubbish! Hopefully, Pottington Quay will have some scenic elements added before too much longer and this will then be used to take better photographs.


Departmental QQV tool wagon

On other modelling projects some progress has been made on my Class 121 DMU, with buffers added and underframe detailing started. I also finished my first tunny wagon, another wagon for my growing engineering fleet. However, I am now away with work for about three weeks or so, so updates will be sporadic at best.

Tuesday, 25 October 2011

Pottington Quay - a little more progress


View from one end of the layout to the other

A good weekend of modelling transpired. Great to have sometime at home and be able to just chill out and enjoy doing some modelling. The two projects that received the attention this weekend were Pottington Quay and the finishing/weathering of my PMV and CCT in engineering olive. The second of these I will post later in the week. Needless to say some progress was made on Pottington Quay.

As always my expectations of what I might achieve were completely over the top. The first task was picking up the Bachman Scenecraft Service Shed. This is an excellent model and after it was duly place on the shunting micro I realised that one of the sidings had to go. So another track plan was required.


A further rejigging of the track plan - this is the final version

The revised plan now has one siding, one line in and one line out. This effectively lost a set of points, reducing the overall number to 3. Whilst collecting the servicing shed I decided to buy a point motor. My original plan was not to bother installing point motors to save money. However, some automatic points seemed appealing, with a more automated layout in general. The gaugemaster point motor looks easy enough to install. But I do not understand if I require a capacitor discharge unit for every point, or can I wire all 3 points to the same unit?? If anyone knows the answer some advice would be appreciated, so please comment!!


My first attempt at scratch building - a warehouse to sit on the quay front

Anyway, in between jiggling track plans and contemplating track wiring, I was busy with the air brush weathering the PMV and CCT. And whilst each coat of paint dried on these wagons I was attempting to scratchbuild a passable representation of the Rolle Quay warehouse. I managed to finish this on the Sunday and tonight it might well get a good wash and does of primer. Has it been successful? The answer to this is I am currently unsure. I think it probably looks ok at the moment, but with some paint added it will show up all the minor blemishes.... we shall wait to see.


The entrance for the second track will be disguised by a signal box - yet to be constructed

Anyway, it is a first attempt, another step into a bigger world of modelling. It also fulfils its function of disguising the entry/exit points for the tracks into the micro. I now am about to start building a signal box and platform to stand behind the warehouse, another task for this week.

Friday, 21 October 2011

Pottington Quay, further progress


The finished Ambeleigh test track, all it needs now is a name board, another task for the weekend

Being home all week has meant that I have made further progress on Pottington Quay. I took the step of finally taking down Amberleigh, my test track layout, which has been running in the spare room for probably around 8 months now, as I needed to borrow one of the trestles for Pottington Quay. Amberleigh is now finished, with the exception of the addition of a name board for the Halt. It has been a great little project, but has now reached the end of its developmental interest for me. Hopefully, one thing left to accomplish with the layout is taking it to an exhibition, but for that I will have to wait for an offer......


Plan view, excuse the feet!

With regards to Pottington Quay, I started to build two structures this week. The first was a scalescenes card kit. These kits are excellent, but my ability to build them is not!!! It ended up in the recycling bin after one night I am afraid!! However, I did go out and take some photos of the warehouse at Rolle Quay and have started scratch building this structure. The dimensions are guestimates, based on the photographs, with the aim of producing a representation of the building. Whether it will look to scale once finished I am unsure!


Rolle Quay from the road side

I have used a plasticard base with stone cladding. This is my first attempt at scratch building, and I am learning all the way. It is starting to shape up, but I do not want to tempt fate yet, there is a long way to go. Regardless of this, I am really enjoying constructing something unique. I am definitely getting bitten by the building bug and now intend to scratch build a larger warehouse for the rear of the layout, possibly using modelling clay.


and my first attempt at a representation of the building

I have managed to gather the materials together for most of the rest of the buildings for the layout. I have the stuff to construct the quay side, the track plan needs gluing down and the powerbus needs installing and then the whole thing needs wiring up. Add to this a small signal box to build, combined with spraying the backscene, and the weekend looks a busy one in modelling terms. I am also hoping to finish of my engineers olive green CCT and PMV and build that warehouse. We shall see how far I get, but I will update to show all (any!)progress.


The warehouse from the river view