Tuesday, 25 December 2012
Sunday, 16 December 2012
Class 08 DCC with working lights and a 12t Van
Well a very relaxing weekend of modelling as transpired. I have managed to get two projects finished, the class 08 shunter and a 12t goods van.
 Finished class 08 shunter, note the windscreen wiper masks
The class 08 project has been a bit of an epic. I reckon I started it about two years ago and it was one of those projects that just lost momentum and stalled for several years. The model came with an 8 pin socket. However, as I wanted to fit the Express Models lighting kit I decided to cut this socket out and hard wire the decoder, making more room for the lighting kit.
 Front end, this is the end with the working lights. Note the buffer beam detail
The fitting of the lighting kit is hard-work, not least due to the tiny amount of room available within the locomotive. In the end I decided to go with only working lights at the front of the locomotive, due to the complexity of getting the lights into the cab/rear of the locomotive. It sounds like a bit of a cop out, but I could not get the body to reassemble properly with the full kit inside.
 The class 08 shunting on Georgeham
With the front lights working I reassembled the locomotive and added buffer beam details and a few gubbins underneath the chassis. It must be said that even with only half the lighting kit in the loco, and a large amount of the chassis metal block cut away, it still is a really tight squeeze.
 Note the working light!!
The weathering was done over the top of the Bachmann factory finished weathering. It was undertaken over the space of probably 2 - 3 weeks, in a non-intense way. The rear windscreens had wiper masks from PH Designs, and a few spays of weathered black frame-dirt and light rust were applied to help all the components blend in together and accentuate/improve the factory finished weathering. I weathered the locomotive fully assembled, so I took care to mask the wheels etc, before I started. After sealing the weathered finish with Acclad varnish I gave it a test run and it works perfectly.

Overall I am pretty happy with this effort. Like everything in life it is no perfect, but it is getting closer and I think (hope) my modelling is getting better. The body is still a tight squeeze on the chassis and this is my only concern with the model. But this is the first bit of stock ready to go on Potting Quay - specifically a shunting micro layout. I should also add that the model with a TCS decoder in performs faultlessly. It traverses points with ease and was a joy to run around on my micro test layout earlier.
The other project I finished today was the weathering of a 12t goods van. This is one of the standard Bachmann wagons which has had 3 link couplings added. With this wagon I applied a weathering wash to the whole wagon, a mixture of thinned weathered black and frame dirt. Once this had settled in all the nooks and crannies I accentuated this weathering by spraying weathered black over the raised detail/roof and frame dirt over the body sides. I don't think the photos do it justice (I am rubbish at photography!!), but I am delighted with the finish on this one. It will be the standard way I weather a number of these good vans for Pottington Quay.
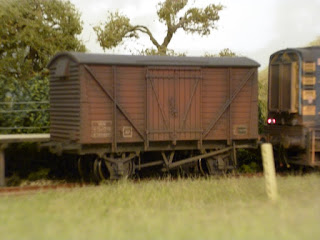 Weathered 12t van

The class 08 project has been a bit of an epic. I reckon I started it about two years ago and it was one of those projects that just lost momentum and stalled for several years. The model came with an 8 pin socket. However, as I wanted to fit the Express Models lighting kit I decided to cut this socket out and hard wire the decoder, making more room for the lighting kit.

The fitting of the lighting kit is hard-work, not least due to the tiny amount of room available within the locomotive. In the end I decided to go with only working lights at the front of the locomotive, due to the complexity of getting the lights into the cab/rear of the locomotive. It sounds like a bit of a cop out, but I could not get the body to reassemble properly with the full kit inside.

With the front lights working I reassembled the locomotive and added buffer beam details and a few gubbins underneath the chassis. It must be said that even with only half the lighting kit in the loco, and a large amount of the chassis metal block cut away, it still is a really tight squeeze.

The weathering was done over the top of the Bachmann factory finished weathering. It was undertaken over the space of probably 2 - 3 weeks, in a non-intense way. The rear windscreens had wiper masks from PH Designs, and a few spays of weathered black frame-dirt and light rust were applied to help all the components blend in together and accentuate/improve the factory finished weathering. I weathered the locomotive fully assembled, so I took care to mask the wheels etc, before I started. After sealing the weathered finish with Acclad varnish I gave it a test run and it works perfectly.

Overall I am pretty happy with this effort. Like everything in life it is no perfect, but it is getting closer and I think (hope) my modelling is getting better. The body is still a tight squeeze on the chassis and this is my only concern with the model. But this is the first bit of stock ready to go on Potting Quay - specifically a shunting micro layout. I should also add that the model with a TCS decoder in performs faultlessly. It traverses points with ease and was a joy to run around on my micro test layout earlier.
The other project I finished today was the weathering of a 12t goods van. This is one of the standard Bachmann wagons which has had 3 link couplings added. With this wagon I applied a weathering wash to the whole wagon, a mixture of thinned weathered black and frame dirt. Once this had settled in all the nooks and crannies I accentuated this weathering by spraying weathered black over the raised detail/roof and frame dirt over the body sides. I don't think the photos do it justice (I am rubbish at photography!!), but I am delighted with the finish on this one. It will be the standard way I weather a number of these good vans for Pottington Quay.

Friday, 7 December 2012
Class 25 update


Today I got some time to paint a few of my models which are in the queue for the air brush. The class 25 repaint is nearing completion and I have to say, I am hopeful of how this one might turn out!! The photographs show the model before the first bout of weathering, after application of a faded BR blue livery and transfers.

It is all coming together quite nicely. The model was separated, with the body and the bogies removed from the chassis. The bogies and chassis were merely weathered over the top of the factory finish, whilst the body was stripped and repainted.

The application of weathering on this project is going to be quite light. The pre-shading underneath the BR blue provides some perspective for the weathered finish, and I only intend to apply some frame dirt and weathered black to the body sides to portray a little bit of grime for a locomotive in service.

Sorry the photographs are not the best quality in the world, but hopefully they do provide an impression of what the locomotive will look like when finished. I will try to finish this project off next weekend, so hopefully a further update then of the final version.


Other projects are also progressing well, so hopefully it will not be too long before there is a finished BR blue class 08 on here too. This is being weathered at the same time and is only a couple of coast away from completion and there are a range of wagons nearly completed as well. Now I really must get on with some track laying and soldering so I have somewhere to run this stock!
Sunday, 2 December 2012
Class 08 update
Recently I have been working away at a few modelling project simultaneously. This means that no projects have been finished recently, with each one inching along slowly. I have slowly been detailing a class 08 in BR blue and this project is now close to getting a proper weathering over the factory-finish weathering.
 Front end detailing
The model is the the Bachmann and 08 and I have spent sometime time adding details, as shown in the Model Rail issue a couple of years ago. All the pipes have been painted up, some underframe detailing parts and added the cab interior painted. The model has also had the Express Models lighting kit added.....more on this in a later post.......The glue and glaze is currently drying on the cab glazing and then it will be assembled for weathering.
 Front/side view
Normally I remove the body from the underframe for weathering and remove the wheels. However, in the case of this model it is quite problematic to remove the wheels, so this time I am going to mask off the wheels and then weather the whole model in one hit. Maybe I will get this finished this week....
 Back end detailing and cab interior

The model is the the Bachmann and 08 and I have spent sometime time adding details, as shown in the Model Rail issue a couple of years ago. All the pipes have been painted up, some underframe detailing parts and added the cab interior painted. The model has also had the Express Models lighting kit added.....more on this in a later post.......The glue and glaze is currently drying on the cab glazing and then it will be assembled for weathering.

Normally I remove the body from the underframe for weathering and remove the wheels. However, in the case of this model it is quite problematic to remove the wheels, so this time I am going to mask off the wheels and then weather the whole model in one hit. Maybe I will get this finished this week....

Subscribe to:
Posts (Atom)