Pages

Friday 27 May 2011

Class 108 DMU back on the rails


Finished weathered DMU. The weathering on the front is a little more extreme than I originally intended, but I still think it is passable

I finally got around to re-detailing my class 108 NSE DMU last night and it has returned to provide the passenger service on Amberleigh. I originally detailed this using a craftsman kit and paint-brushing on various shades of railmatch enamels for weathering. At the time I was pretty happy with it, but subsequently have found the finish leaving a little to be desired.


Wider shot of the first car

With this in mind I ordered several wiper masks packs from from PH designs, with this being the first loco to test them on. Last weekend afforded me the time to tackle this project again. Probably the finish on the front windscreens is a little heavy, as I got carried away with the wiper masks - but I am happy to put it down to modellers licence!


Evening service back to Barnstaple

The body had various shades of sleeper grime, roof dirt and weathered black sprayed across the bottom of the body. Matt back was also painted into the door frames and the excess wiped away with a cotton bud dipped in white spirit. The other key issues were tidying up the decoder wires and the fitting of the driver. Even though the weathering job is much heavier than the previous attempt, I am much happier with the result.


The brighter light in this photograph is due to it being early morning, with the first service of the day to Torrington.

Just undertaking this little weathering exercise reminded me of how good a model the class 108 is and how much I like first generation DMUs. It also got me round to thinking about the half built DC kits class 119 DMU I still have not got round to finishing. I really want a two car 119 and 3 car 120 DMU for Watergate Halt. I am seriously thinking about using the Replica motorised chassis for the kits instead of the Black Beetle motor bogie as supplied with the kit. Tempting, but we shall have to wait and see what time is available after summer..


Finally the DMU has a driver

On other projects the BCK lighting has proved a much more difficult task then I had originally expected. This projects is still in progress and the fix has been much more laborious then I had hoped for. However, I think it will work, but I will post again to describe it later next week. It is definitely a feature of the Bachmann Mk1 construction, with the sides fitting onto the roof that causes this problem - the mk2 coaches being a 1 piece body shell will not suffer the same problem. I still have not got round to finishing the whale, finishing the paint job on the CCT or building the PMV. I also have a stack of locomotives for detailing and a load of detailing parts....

Monday 23 May 2011

Express models Mk1 BCK coach lighting


The BCK with the lights on

A busy week passed and although I had to cover my girlfriends shifts in the local pub over the weekend, I still managed to get a fair bit of modelling done. I mainly concentrated on re-detailing my class 108 DMU and also fitting the first of several coaches with an express models lighting kit. This project did not go entirely too plan!


The effect of running some black paint into the door seams is clearly visible from this picture

The coach is a mk1 BCK which is one of the coaches that will eventually run on my forthcoming Watergate Halt layout. Having gone fully digital, the latest DMU releases highlight the lack of coach lighting on modern 00 gauge coaches. So I intend to light at least four of my current coaches to form a rake that will operate an early morning/later evening service, as was often the case on the tarka line.


The interior lights highlight the internal passengers and detail

I detailed the coach body in my normal manner, based on Geore Dent's methods, mainly involving running weathered black paint into the door seams and removing any excess paint with a cotton wool bud dipped in white spirit. An airbrush was used to separately weather the lower sides, underframe and roof. The bogies were also removed and painted and weathered separately.


The light bleed between the roof and sides is also evident in this picture - how frustrating

In order to detail the coach the properly I separated the sides and roof and floor. I painted interior seats a light blue colour and added the lights as per the instructions (with a straight feed to the rails not using a decoder). I reassembled the coach excitedly, soldered the contacts on the bogies and put it on the track. The lighting effect looks excellent, but, and it is a large but, there is a clear gap between the roof and the body sides. The light clearly seeps through the gap at several distinct points.


A slightly dark photograph, with the light bleeding clearly evident between the roof and body sides.

It was all a tight squeeze to get everything back together and I wonder if this has just pushed the roof a little too far. I also think I am going to have to seal this gap between the roof and sides with araldite to similar. However, I am weary of squeezing some glue onto the body sides, which I was really pleased with the finish on. I am now going to have to take it all apart, probably sand a bit more off the top of the compartments, glue the sides and resolder it all!!! So nearly finished but not quite. However, the lighting kit is excellent and the effect worthwhile, so I hope with another evenings effort I can get this one finished this week. I will post again later in the week to show my efforts....

Tuesday 17 May 2011

POA scrap wagon


Finished POA conversion, with a pretty severe weathering job

We spent a lovely weekend camping in Dorset this weekend, but the net result was no modelling again over the weekend. However, work seems to have eased a little at the moment and I am home for at least two weeks now. This has given me sometime to actually sit down and do some modelling. Anyway, it looks like I might actually finish some models this week!


End view showing the comparison to the factory finish


And same again

The first thing I have finished this week is the conversion of the Bachmann SSA wagon to a POA wagon. The conversion only requires removal of original transfers and the addition of POA transfers on a black data panel box. The couplings were converted to 3 link couplings (see earlier post) and then a fairly hefty weathering job was applied. All in all I am pretty happy with how it turned out.

I now have the second one to do, which I want to damage a bit more than this first attempt, with a more prototypically bashed top. I also need to add some loads from Ten commandments or similar. The interior of the wagons were not really sprayed, due to holding the wagon from the interior, so I might hand-paint some weathered black pain onto the interior, once I have the loads in. I am looking forward to running a short scrap train on my branchline.


Another view of the finished POA wagon


The original Bachmann weathered finish on the SSA

I took some of the photographs of the modified wagon with the original Bachmann wagon, which comes ready weathered. I thin that it makes for an interesting contrast. The factory finished weathering is ok, but very light and all one colour. I am not going to bemoan the quality of Bachmanns offing, it is excellent. However, with a few evenings work on the airbrush, I think a much better weathered finish has been achieved.

All other projects are progressing nicely. The whale is nearly built now, the lighting unit is almost fitted in to the BCK and the class 108 is currently in pieces for some further weathering. I received the weathering masks from PH Designs last week, so my class 108 is the first test of these. I have also done a little more DCC research and have decided on my preferred DCC controller for the next layout, Watergate Halt. As soon as the baseboards are built I am going to purchase this controller, but I will leave the details of all this for another post....

Sunday 8 May 2011

Amberleigh engineering works


Shot from the bridge, showing the entire layout and short engineering wagon

A lovely weekend was spent surfing and drinking. Great fun, but little modelling accomplished! Last week I spent a few evenings working on a some projects, with progress being made on my POA wagon. This will get finished soon.


The salmon wagon, finished in a plain black livery


The engineering train trundling past Amberleigh Halt

I also put a little train together on Amberleigh, consisting of a class 25 hauling a short engineers train, consisting of a lamprey, grampus, crab and salmon wagon, coupled with a SR 25ton brake van. This short train is loosely based on a lovely photograph of a class 22 hauling a similar train along the withered arm, shortly before it was brutally hacked apart by Beeching. The main difference is the modelled formation is a little longer and the class 22 has been replaced by a class 25. The lamprey and crab are Chivers Finelines kits, the grampus is from Parkside and the brake van and salmon wagon are from Cambrian. The transfers visible on the lamprey and grampus are some homemade ones. The lamprey one is an inkjet print onto decal paper and the grampus one is a tipex like pen onto some spare decal backing paper. I think this train looks great for a local engineers working, but a load for the grampus does need to painted.


The class 25 hauling the train, with the lamprey visible. Note the home made graffiti decal on the lamprey

Currently the whale wagon is 50% built, but I am Still waiting for the buffers from MG sharp models - it is really frustrating, but this project is going nowhere at the moment. I have ordered some detailing bits from PH designs and I am expecting these soon. These will be used to super detail a class 47/0. I also managed to get as far as test fitting the lighting unit in a blue grey MK1 BCK. I have totally deconstructed the coach and am looking to start the weathering of this in the next couple of weeks.


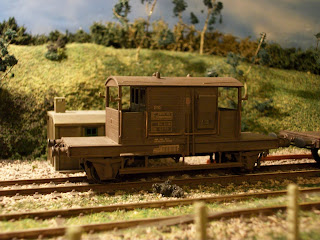
The SR 25 ton brake van at the back of the train

The other projects are the CCT and the PMV. The CCT is in the paintshop and if I ever get a full week at home this will be finished. I am up in York for a lot of next week on work, so I hope to take the PMV with me to finish the build on it. The class 108 DMU is also back in the paintshop, to have some weathering of the coach body and also to have a stab at refitting the decoders, which are currently too obvious through the windows. The other big projects I have on the go is the detailing of a class 121 unit. Oddly I have all the parts to finish this model, but other than undoing the body, little forward movement has occurred. Hopefully I will pick these projects up in the coming week, but time as ever is precious and limited.


General shot of the Amberleigh test track

In respect of the engineering wagons, I contacted modelmaster decals this week, regarding transfers for the whale, tunny, lamprey, ling and crab wagons. basically, these are a series of releases over the last 5 years or so. Having built quite a number of these wagons over the last few years I find it frustrating not to be able to finish these wagons properly. The good news is that releases for these wagons are imminent. I guess I had better build so more of them now.....


The grampus wagon. Again note the homemade graffiti decal

Monday 2 May 2011

Mk 2 BFK and some coach lighting


Finished mk2 BFK

Today I got around to finishing off the weathering/detailing of a blue grey mk2 BFK. This is the Bachman coach, to which I have added some grime on the underframe, with a light weathering of the body, and more dirt on the roof and ends. I made a dilute wash of weathered back which I ran along the door edges, but this is barely visible on the pictures. I coupled it up with a mk1 intercity buffet, presuming the buffet had been converted to air brakes, or this was one of the early mk2 batches, which could be coupled with standard mk1 stock.


Coupled up with the mk1 intercity buffet


The weathering of the coach underframe and lower body is visible in this shot

I am pretty pleased with how this one has turned out, with the weathering job much more subtle than on some of the intercity mk1s I have done recently. In the interior two seated passengers have been added. This is about right for a rural Devon service in the week! There were often some scratch combinations of coaching stock on the tarka line in the 1980's, so although this train might not be prototypical, it is certainly plausible (at least in my imagination).


Passenger in the coach


One of the passenger catching up on the news

This is the first of several mk2 coaches that I am going to detail for Amberleigh and Watergate Halt. I plan to run a rake of mk2 coaches and 2 rakes of mk1 coaches, each between 3/4 coaches. I am going to add interior lights to one rake of mk1 stock, using express models lights. I also started the first coach of this rake today and started to hack up the interior to allow the lighting unit to fit. By adding the interior lights I am going to have fully detail the interior, painting the seats and tables etc.


The dismantled BCK with the express models lighting kit

On other projects I have done some more work on the POA, this is now ready for the transfers to be added. I also added the first coat of olive green on the engineering CCT today. Other than this the detailing of the class 47 and class 121 DMU have not progressed. Hopefully I will get some more time over the coming fortnight to progress these projects.