Finished 03, showing off the weathering on the locomotive
This weekend I finally managed to finished off one of my long standing projects - not that this was a particularly difficult project, but the Bachmann class 03 has finally entered service. The biggest catalyst for getting this finished is the ongoing construction of my micro-shunting layout. The embryonic layout has seen little progress, but at least now there is one shunter to pootle about on the layout!

The 03 earning its keep shunting 12t vans at Amberleigh Halt
In my humble opinion, the Bachmann model is an absolute belter, except for two minor issues. The first and by far the most obvious, is the big hole in the buffer beam for the coupling. This is a nightmare and the plug in replacement does little to improve things. I had a long hard think about filling this gap. However, the rivet detail is very close to the hole and also with much time away from home coming up I was keen to get something finished. So I opted for the replacement buffer beam parts which come with the model. I am now wondering if this compromise is going to get to the point of complete annoyance, so I will have to start again. At the moment I can live with it, but it is less than perfect for an otherwise great model.

To weather the locomotive I took the body off the chassis and separated the cab. Not snapping the various pipework attached between the body and chassis was tricky
The second issue with the model is the chassis block is solid metal, right up to the plastic body. This means that fitting couplings is a little bit of a nightmare. Personally I use 3 link couplings, not too everyones taste I know, but they work for me. However, fitting 3 link couplings to this model is a real headache, due to having to cut away some of the metal chassis if the full coupling hook is to be accepted. In this case it would of meant cutting away the holes for the screws that attach the body to the chassis. In the end I had to cut the coupling right down and glue it with araldite to the body. The coupling had to be filed right down and the hole in the metal body considerablyopened out. As a consequence I decided to do this only on the rear of the locomotive, so it only has one functional coupling.

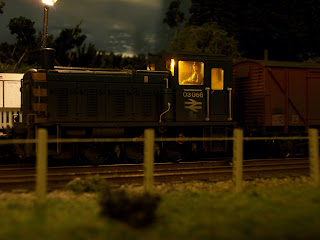
The shunter with its cab light on
Bar these minor niggles, I took the loco apart, painted the cab interior, then masked off various portions of the body. I weathered the cab, body and chassis separately, before reassembly for a final coat and some varnish. The chassis was all hand painted, including the wheels and the coupling rods, brakes etc. The roof was weathered in matt black. The body sides, grills, etc,had various sprays of sleeper grime, frame dirt and weathered black. All in all I am reasonably happy with the result, and am glad it is now a working model in my small, but growing, locomotive fleet.

Running light at Amberleigh
The construction of the micro layout has all but ground to a halt, due to friends and work taking up all the time. The next month sees me working everyday except 2 weekends, so it is doubtful any progress will be made on anything. However, to compensate for this,I am taking two days off later this week. The aim is some modelling indulgence, so hopefully I can make some headway in getting the shunting layout up and running. And then there is the issue of a shunters match truck to go with the 03....

A slightly elevated view, showing the weathered roof and bonnet
No comments:
Post a Comment