Pages

Friday, 30 September 2011

PMV and CCT progress


The nearly finished PMV, with a few issues to be resolved...

I have made a little progress on my PMV wagon this week, painting the handrails and adding some transfers. Alas, sometime off in the week did not materialise, so I did not quite get around to finishing this project. I got out the CCT I had recently finished to compare it with the PMV. After not having seen the CCT for a while, I was slightly disappointed with its appearance, especially the varnish around the transfers.


The CCT in departmental livery

Both of these wagons are finished in departmental olive green and are intended to convey parts/tools to the wagon repair facility I am about to build as a micro layout! How prototypical this is I do not know, it really is just a little bit of fun!

The PMV also has had a very poor glazing job, with some glue and glaze blobs clearly visible on some scratched windows. In addition, the roof is a smidgen too short one one end, I might be being a little picky, but these little details really make a difference too me. So all in all I am not too happy with how either of these wagons have turned out!


The CCT. I find the transfer/varnish finish less than perfect on this. I intend to gently weather over the top of it.

So to the remedies. The CCT is going to have a light weathering of frame dirt and general dirt around the underframe and lower body, to blend in the varnish finish. The PMV is intended to be finished in a heavily weathered state. So I am going to add a layer of glue and glaze to the windows,before giving the whole wagon a heavy weathering, including windows.


The poor glazing job on the PMV. A good lesson in trying not rush modelling when tired/when you other half is nagging you to do something else!

I hope these improvements will alleviate the little niggles I have with these wagons. We shall see. However, I have to go away with work now for about 10 days, so it will be a while before I can get going on this wagons again. As a consequence my next update will be a couple of weeks away - see you then.

Tuesday, 27 September 2011

A Bachmann 03 enters service


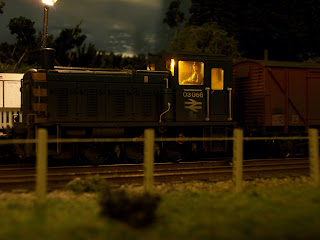
Finished 03, showing off the weathering on the locomotive

This weekend I finally managed to finished off one of my long standing projects - not that this was a particularly difficult project, but the Bachmann class 03 has finally entered service. The biggest catalyst for getting this finished is the ongoing construction of my micro-shunting layout. The embryonic layout has seen little progress, but at least now there is one shunter to pootle about on the layout!


The 03 earning its keep shunting 12t vans at Amberleigh Halt

In my humble opinion, the Bachmann model is an absolute belter, except for two minor issues. The first and by far the most obvious, is the big hole in the buffer beam for the coupling. This is a nightmare and the plug in replacement does little to improve things. I had a long hard think about filling this gap. However, the rivet detail is very close to the hole and also with much time away from home coming up I was keen to get something finished. So I opted for the replacement buffer beam parts which come with the model. I am now wondering if this compromise is going to get to the point of complete annoyance, so I will have to start again. At the moment I can live with it, but it is less than perfect for an otherwise great model.


To weather the locomotive I took the body off the chassis and separated the cab. Not snapping the various pipework attached between the body and chassis was tricky

The second issue with the model is the chassis block is solid metal, right up to the plastic body. This means that fitting couplings is a little bit of a nightmare. Personally I use 3 link couplings, not too everyones taste I know, but they work for me. However, fitting 3 link couplings to this model is a real headache, due to having to cut away some of the metal chassis if the full coupling hook is to be accepted. In this case it would of meant cutting away the holes for the screws that attach the body to the chassis. In the end I had to cut the coupling right down and glue it with araldite to the body. The coupling had to be filed right down and the hole in the metal body considerablyopened out. As a consequence I decided to do this only on the rear of the locomotive, so it only has one functional coupling.


The shunter with its cab light on

Bar these minor niggles, I took the loco apart, painted the cab interior, then masked off various portions of the body. I weathered the cab, body and chassis separately, before reassembly for a final coat and some varnish. The chassis was all hand painted, including the wheels and the coupling rods, brakes etc. The roof was weathered in matt black. The body sides, grills, etc,had various sprays of sleeper grime, frame dirt and weathered black. All in all I am reasonably happy with the result, and am glad it is now a working model in my small, but growing, locomotive fleet.


Running light at Amberleigh

The construction of the micro layout has all but ground to a halt, due to friends and work taking up all the time. The next month sees me working everyday except 2 weekends, so it is doubtful any progress will be made on anything. However, to compensate for this,I am taking two days off later this week. The aim is some modelling indulgence, so hopefully I can make some headway in getting the shunting layout up and running. And then there is the issue of a shunters match truck to go with the 03....


A slightly elevated view, showing the weathered roof and bonnet

Friday, 23 September 2011

Bachmann VBA wagon


Weathered VBA wagon


I have spent a lot of this week in York, and although a very enjoyable visit, left little time for modelling. I think I must start every post saying how little time I have!! I must not grumble though, we are in the midst of a bad economic down turn, so I am very lucky to have work.


Anyway, back in the real world of railway modelling, one little project that was recently completed was a light weathering of a Bachmann VBA wagon. The wagon was taken apart, the coupling removed, 3 links added, and then put back together, with some light mistings of weathered black, frame dirt, sleeper grime and roof dirt sprayed across the underframe and lower body. Like all things practice makes perfect, and I am getting quicker at weathering these items of rolling stock and hopefully the results are getting better!


Note the grease blobs on the buffers

Although I am super busy with work, one of the main delays at the moment is getting the transfers to finish off projects. I am waiting on some class 25 transfer packs and whale/tunny packs for a series of projects on the work bench. Also my son and I had a play with the shunting layout at the weekend, and he decided we needed an extra siding on the layout. This has duly been added and I am hopeful on making some progress on this layout over the weekend, not least adding a bandy back scene and getting the track pinned down and wired up. I will hopefully put a post up of my progress later in the weekend.

Tuesday, 13 September 2011

A micro layout design


The new micro layout track plan, now what to call the layout...

Another week and work flies by. This weekend I mainly spent relaxing with my girlfriend. Over the weekend I brought the model rail mag, and found myself drawn to the micro layouts. The ideas festered overnight, and by saturday I decided I was going to build one. I decided on a 5ft running length, a 2ft simple fiddle yard and by saturday afternoon the baseboard was built!!

I am supposedly detailing a class 08 at the moment (this project has been going on for a while now!!) and also an 03 is slowly being weathered. So I decided a wagon repair facility near Barnstaple junction, at the end of the tarka trail would be a good idea and give me somewhere to run these shunters. As it is set in Barny, it can have a little waterfront feature - hopefully something in the vain of Brewhouse Quay, but we shall see if it gets anywhere near that standard.

The photographs show the track plan I have settled on. One of the smaller sidings is going to have a wagon repair works, with a siding to hold wagons and one to split trains that have come in. The headshunt will be part of the fiddle yard for the siding on the right, but I think I can get away with that! Looking foward to getting this up and running, but need some time and money.....

Wednesday, 7 September 2011

Class 119 DMU started......and back to blogging

At last I am back home. After about 5 weeks away working, 6 days a week, on some incredible projects, it is great to be back home. To this end I have started building my DC kits class 119 DMU and have also started building a Chivers Finelines Tunny wagon. The DC kits class 119 is an interesting kit. It cost about £150, not cheap, especially when compared to the standard of ready to run DMU's about. I have put the body shell together and most of the floor components are in place on one of the cars. I still have the second coach to build this weekend. However, conceivably it could be in the paint shop within a week...

Front end of the class 119

Considering the cost of the kit I cannot work out if it represents value for money. The mouldings are excellent. The underframe detail is basic and there is some individual licence on how to actually fit the body to the chassis. This said, with a bit of effort and a few extra parts I am hoping to be able to create a passable rendition of a class 119 DMU, although only time will tell. Ultimately, it is about creating something which is an acceptable representation of the original. It will never be perfect, so my modest aim with this one is to produce a finished working model. This is the first time I have undertaken a model like this so this is all new territory for me.

Back end of the 119

The DMU will be a two car unit, although DC kits sell this as a three car model. I attempted to build the centre buffet car from the floor up, and to be perfectly honest, made a bit of a mess with it. So it will now be a two car DMU, here is hoping that the two car unit will be more successful. The original centre car is currently being canabalised for spare parts for the rest of the model.

The bodyshell during construction

On other projects, the detailing of my class 121 dmu unit has ground to a halt. This has been due to the poor running of the original chassis unit. My solution? Well after being away for so long I thought I should treat myself to a couple of new trains. So a new class 121 and 45 will hopefully be winging their way to me soon. I intend to swap the chassis unit over from the new 121 onto the blue body shell. The new 121 DMU is an absolute steal from Hattons. Once this 121 project is finished I might then take the old chassis apart and see if I can cure the bad running. Other than that I might finish of the PMV wagon this weekend and also get the whale painted (still waiting on the release of transfers from model master for this, and the tunny/lamprey/crab!!).

View of the nearly complete first car of the two car set

My other big task his weekend, is to take down Amberleigh Halt. This is going to be moved to the living room for the weekend, which has much better natural light. I am going to finally finish Amberleigh by adding the platform halt name board. And then, I am not sure - probably give it to my son to play with. Up on the layout stand will be going the boards for the next layout in Watergate Halt. I will hopefully make some headway on this this weekend too......