Pages

Tuesday 28 December 2021

Further O Gauge Layout Progress - Kimmington Quay

Over the last year I have not achieved as much modelling as I would have liked, life continually got in the way.  My work life has been very time consuming since August and as a result modelling has firmly taken a back seat.  One of the aims for the new year is really get modelling again and drive the new layout forward.

Track wiring complete and the first trains are running.

Anyway, the new O gauge layout has a name, Kimmington Quay, and of course is set in North Devon.  There has been sporadic progress on the layout over the last few months, but it has been very stop start, a consequence of having to work far too many weekends.  Anyhow, the layout is now all wired up.  It has a control panel, built as an extension for the layout providing enough room for a diesel to run around its train.  It is a compromise on space, but the thing with O gauge, is it is big!  The control panel has a DCC Concepts Alpha Unit to operate the point motors via S lever point switches and Cobalt point motors.  Whilst this is slightly more pricey than a standard point motor fired off a solenoid, the reduction in underboard wiring alone is worth the cost.  Add in the satisfaction of using the point levers and in my book it is a winner.

The control panel unit for the layout with track extension. The DCC Concepts Alpha unit will be mounted - another job to do!

The power to layout is supplied using a NCE Powercab, as per my OO gauge layouts.  However, as I plan to have at least 2 sound chipped locomotives in O gauge, I used a Tam Valley Booster to up the available current to around 3 amps. This is now all wired up and working.  The trackwork is all Peco FB Code 143, with electrofrog points, using Gaugemaster polarity switches.  All the trackwork is now glued and pinned down.  The curves are very tight for O gauge, but it all just about works. The Powerbus is the Express models kit, with 2 droppers soldered to every piece of rail.  

The curve heading towards the fiddle yard, aka Barnstaple Junction.

Kimmington Quay platform halt, viewed from the inter tidal estuary.

View out of the station heading for the control panel run around, aka towards Ilfracombe!

I ordered a Dapol class 122 with a decoder fitted, as I needed something to test the layout with.  This has been pottering around the layout to get a feel for how it will operate.  I think the layout will work well, although ideally it really needed to be 4ft longer, however, I just do not have the space.  The platform building is 4ft long and in O gauge this doesn't even accommodate 2 Mk1 coaches, so this is very much a halt rather than a mainline station.

The layout is finally operational with the class 122 pulling 2 mk1 coaches into the station.

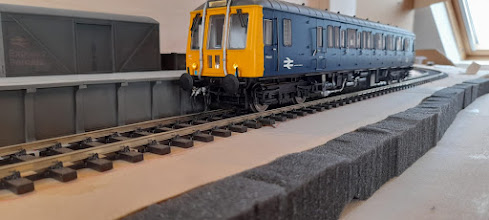
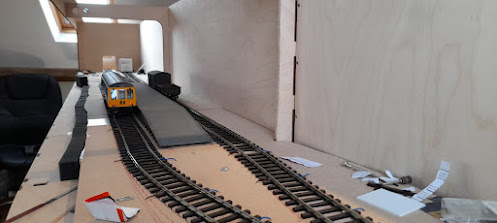
So current tasks are to paint the track and then glue down the platform. At the same time I am going to start building the quay wall at the front of the layout using a combination of plaster bandage and DAS modelling clay.  As for the layout buildings, the pub is 99% finished, I just need to add some guttering and finish this off and I have started building the harbour masters office for the front of the layout.  There is a dairy located at the back of the layout, with the platform built and ready for painting, another job for the coming weeks.  So plenty to do, but hopefully progress will be a bit swifter than it previously has been. 

Friday 24 December 2021

merry Christmas one and all

 A happy Christmas to everyone! I hope everyone has a fantastic xmas and gets some railway related models!

Next year I will be back to blogging, with the O gauge layout making good progress.  Until then - have a good one!


Sunday 15 August 2021

0 Gauge layout progress

I have recently been modelling away on a new 0 gauge layout, although progress has been a little slower than I would have liked.  The main job has been to construct a platform.  Once this bit is finished, I can glue it into place and line the track up.  I purchased some laser cut kits to construct the platform, with the top of the platform being made from 2mm plasticard.  This is now being painted ready to install. Having moved up to 0 gauge, the size of everything seems huge compared to modelling in 00 gauge - everything seems to have a bit more presence.

Finished platform ready for painting.

Platform is now slowly taking shape during the painting. Being 0 gauge, it is taking a lot of paint to cover it!

I am also building a Petite Properties building, which will be a pub.  All layouts seem to have a pub nowadays - and I am pretty happy with how this one is shaping up.  The exterior is scribed polyfilla, painted with some cheap enamel paints.  There is a bit of detailing to go, with a partially modelled interior, but it is getting there.  I am pretty happy with the finish so far.  I am scratch building a bit of interior furniture and will add some pub benches/flower pots, etc outside.  


Interior tables and bar during painting.

Overall the layout is 12ft long, although the end board to a fiddle yard is curved.  The track is running on a raised level, allowing me to model an estuary/sea front, just like Barnstaple. One of the next big jobs is to order some DAS clay and build the stonework at the front of the layout.  

The raised level on the layout.

I am finding modelling in 0 gauge so much more fulfilling than 00 gauge.  I am also finding that my capacity to scratch build bits and pieces is much easier in 0 gauge - to me it feels a lot more realistic to model in (although I have not made that much progress!).  I think that for now I am now definitely an 0 gauge modeller and have sold off quite a lot of my 00 gauge stuff.  I think this is definitely the way forward for me.

Monday 19 July 2021

00 gauge 12T box vans

I have recently been ticking over a few projects in the modelling boxes, although my enthusiasm for finishing off the 00 gauge projects is quite low at the moment.  I have mainly been working on 0 gauge models and am really enjoying working in the larger scale.  I am currently wondering whether I will return to 00 gauge at all - I am not sure.  I need to get the 0 gauge layout working then see how this feels for space, etc, before committing.  However, right now I certainly feel that 0 gauge is the scale for me.

Weathered vanfit.

Anyhow, I did manage to finish off a couple of 00 gauge 12T box vans at the weekend.  The vanfit I weathered years ago, but I thought the finish could be improved, whilst the shocvan was a new model. Both are now finished and rehoused in their respective boxes, although the Charlton layout has now gone, so I have nowhere to run them.  It still feels good to finish these models off and I hope to clear all of the 00 gauge models from the paint boxes before refilling them with 0 gauge wagons!

Weathered shocvan.

Sunday 6 June 2021

End of the line and a new 0 gauge project

There have not been too many posts over the last few months.  However, a few projects have been slowly progressing and there has been a lot of mulling over what to do next.  I have had a set of baseboards on order for several months to complete a 00 gauge layout with two stations (well one station and a small platform halt). After finishing Charlton I feel I have developed the skills to tackle a larger project.  However, at the same time, my enthusiasm for this bigger project has been waning.  Charlton is soon to be rehomed, to free up some space for the new layout.  For the next layout I have finished building the smaller platform and the platform shelter has been in the paint boxes for several months.  However, there is no real momentum or excitement at the moment for the project (the fabled modellers mojo!).

The Charlton layout.

It certainly feels a bit strange to be passing Charlton onwards - it is where I test any rolling stock, but the time has come to tackle something new.  I really hope the new owner gets as much fun and use out of it, as I have. I have taken it to four exhibitions and when I started it, I never imagined that I would be capable of building and operating a layout at an exhibition.  It was a great learning curve and the layout has always performed near faultlessly. 


The new platform for Kimwick Halt in 00 gauge, pretty much complete, except for a bit of tidying up here and there.


Anyhow, I have decided to have a brief interlude from 00 gauge and although I will keep ticking over with 00 gauge modelling, finishing some projects in the model box, I have decided the next project will be an 0 gauge layout.  I hope to finish this layout within a year and I feel inspired to be able to build some bigger rolling stock for it.  It feels great to have a plan for the new layout and I hope to make some progress on it pretty quickly.

Saturday 1 May 2021

Class 25 and a herring wagon

Modelling progress has been very slow over the last two months, although I am not entirely sure why.  I am still waiting on the new baseboards and I am contemplating future projects.  I am more and more inclined to head to an 0 gauge layout, although I think I am going to stick with the 00 gauge layout for the next project and maybe start building a small 0 gauge layout at the same time, as a test run.  Anyhow, I have been very slowly ticking over a few projects in the paint boxes.  The first is a class 25; this is a very long term project that has continually been on the back burner.  I originally weathered this locomotive about a decade ago and was initially delighted with the finish.  However, as my weathering skills have (hopefully) developed, I decided to paint strip this locomotive and start again.  It has been in the paintboxes for probably 5 years now - making very little headway.  The application of the new BR Blue/yellow livery was not my best and added to this, I have already got two fully sound chipped working class 25s for the layout.  So I have decided to model this class 25 in a very dilapidated state - partly to cover the less than perfect livery and partly to provide something a bit different on the layout.  The model is currently being varnished ready for transfers.

A somewhat careworn appearance is being aimed for in the class 25 repaint.

I have also got a few other wagon building projects slowly progressing.  This is a the Cambrian Herring wagon, which I am going to build a small number of, for the layout.  These are tiny wagons and a bit of a headache to build, trying to work out where all the little bits fit - but it is starting to shape up now.  I used maskol to cover an initial rust coat on the wagon, before applying most of the livery (black!) and a bit of light weathering.  It is coming together now and I should be able to remove the maskol in the next week or so, just ready for transfers and final weathering.  

Herring wagon during painting.

So some progress here and there, although all my modelling is currently lacking a bit of motivation and momentum at the moment. Fingers crossed I will get a bit more time in the coming weeks.

Saturday 3 April 2021

Kimwick to something junction and an 0 gauge wagon!

The new layout has been started, albeit it in very slow fashion.  I have some of the baseboards, with the rest on order and I am now slowly making a start on the buildings.  The layout is designed as a continuous run around (I found working a terminus to fiddle yard at exhibitions quite exhausting), which will allow me the options of running some longer trains, plus I can let the trains run a little more easily whilst I sit back and watch!  The track plan is designed to have a station junction (similar but smaller to Barnstaple jn), before a single line section, with a further platform stop.  The station junction is yet to be named and will sit on a 5ft scenic board.  The platform stop is going to be called Kimwick (I know very anglo-saxon in Tarka country) and this is the board I am going to start first - it is a smaller 3ft section heading onto a curve, with a single point for a goods shed.  So this week I have made a start on the platform and it is all going to be modelled on glorious SR concrete.  The platform shelter has been sat in the paint boxes for a few months, but I have slowly been painting this recently.  The actual platform is made from Dart Castings supports and plasticard - it will be a very simple structure.  So the progress so far, I hope to finish this over the weekend, now I have made a start.


The platform  being built for Kimwick, over the bridge from something junction.

The layout will be slowly built over the next couple of years - I have a lot less time for modelling at present, so the primary aim will be to get the track working and laid out, before detailing each board in turn, as I build structures, etc.  

Other modelling has been progressing slowly, but surely, and a few more projects are starting to shape up.  One of these is an 0 gauge brass wagon, my dad recently built.  I offered to paint it for him, so progress so far.  It needs some varnishing and blending together, but over this is looking good I think.  I made a concerted effort to get a more realistic wood effect and I am reasonably pleased with the outcome.


0 gauge wagon, with a better effort at wood effects.

There are lots of other projects ticking over at present, with a fruit D wagon, class 25, salmon wagon, herring wagon, lamprey and some box vans all in the paintshop. I have also finished the detailing on another warship and finished the construction of the 0 gauge 13t open wagon - so these are ready for washing.  More updates to follow soon I hope.  Otherwise I hope everyone is well and has an enjoyable easter.

Sunday 14 March 2021

Olive green BG for the Engineers train

There have been fits and starts of modelling over the last month or so, with projects ticking over but nothing really been completed.  However, a somewhat unexpected free weekend, meant that I was able to put the olive green BG for the engineering train back together with an internal lighting unit.  The layout was not set up - so I have not managed to test the lights (fingers crossed they are wired up OK).

Finished BG coach, now working in the engineering fleet.

This is the Bachmann model, that I took apart and weathered separately, before reassembling today. I used railmatch paints throughout, applied from the airbrush, after an all over wash of weathered black and sleeper grime.  This is the final piece of rolling stock for an engineering rake, consisting of an SR PMV, CCT, BY and the GWR Iron Mink and Python wagons.  This all adds a little variety to the rolling stock and trains I can run on the future layout.

Another view of the completed BG.

There a lot more projects to finish off. I have the sound decoder for a class 108 DMU that requires detailing, alongside a new Bachmann class 121 and a class 42 warship that needs detailing.  So plenty to do in the next few weeks.  Hopefully more to follow soon.

Sunday 14 February 2021

Class 50 and Class 25 on engineering works at Charlton station

This weekend I ran a few trains on Charlton.  It is probably the last time I am going to set up the layout before selling it.  I fixed up a rake of engineering spoil wagons and also some hopper wagons.  The engineers spoil wagons are all kit built and it gave me a lot of satisfaction seeing the rake running together.  They have been completed over the years, with varying levels of competency; however, it feels very great to see a train composed of my own kit built stock.  It is now time to sell Charlton and make room for the next layout.  I have a baseboard ready to start (subject to some work with a saw to open out one end) - and I am excited to build a much more ambitious layout.  Anyhow enjoy for now - more updates soon!

Engineering Sunday at Charlton.

Initially a Class 25 brings in hopper wagons with fresh ballast.

Before leaving and collecting a rake of spoil wagons for spent ballast.

The spoil train is too long for the loop at Charlton, so a class 50 picks up the train to head down the line for track relaying.

Tuesday 9 February 2021

Class 50 just about ready to roll

A long saga from the depths of my modelling boxes has just about been finished.  I now have a DCC sound Class 50 for the layout.  I do like the Class 50s and originally wanted a couple for layout....so I purchased the Hornby model around c. 2011 in BR blue.  This model languished for ages, whilst I got around to finding some time to play with it and finally in 2016 I took it out the box.  The model just would not run from new.  It turns out, this model had a faulty PCB board (it was well known fault) that Hornby had replaced for free at the time; problem was by the time I got around to looking at it, Hornby refused to replace the PCB board, as they said they had no replacement boards available.

Resolution - overall I am pretty happy with the finish on this locomotive.

I had by then acquired another second hand Class 50, so I used this chassis, coupled with the BR blue body and set about detailing the body.  As per normal multiple washes and coats were applied to the body to provide a little bit of tonal variation, whilst the chassis and bogies were treated separately.  Putting the locomotive back together was a total nightmare.  The Hornby glazing, once out is very difficult to get back into place and it looks pretty poor.  The headcode box also needs replacing properly.  However, I have had such a difficult job to get this back together (the glazing, plus the doors) that I am reluctant to take it apart again.

The class 50 seen here shunting some wagons at Charlton.

I like this shot a lot - it looks like a typical, grey overcast North Devon day!

However, the verdict?  I am delighted with the how the model turned out, minus the niggles mentioned above.  The Howes DCC sound chip is pretty fantastic too, so it looks like a class 50 and sounds like one also.  I am going to try to replace the headcode box from the outside and then let sleeping dogs lie! However, I am somewhat put off buying a Hornby diesel locomotive again.  The bogie side frame arrangement is difficult to work with (in my opnion).  Added to this the PCB board was faulty and the ability to take out the cabs/glazing and doors was very awkward.  Would I bother to do another?  Well I do want another class 50 and have one ready to paintstrip....I had better let the memory of this fade away before I start.....

Anyhow a couple of videos of it pottering around Charlton station.


Sunday 31 January 2021

Well what an enjoyable weekend: An 0 gauge Lowmac and 13T open wagon, an 00 gauge Sr 40T wagon and a LNER CCT!

This weekend I have had some time to really do some modelling, a few undisturbed stints over the weekend.  I have to thank my most amazing partner - who is very understanding when I say I am going to disappear for a few hours!  Anyhow, enough of that - more about the modelling.  I have a few, very long burner projects that have dragged on and on.  The first is a Slaters 0 Gauge 13T open wagon.  I have no idea how long I have been on this project, but it has been dragging on for probably 4 years.  This week I am finally getting around to finishing this off, just needing to add a few etched brass castings.  One side of the wagon is almost finished and the second side will be a lot quicker now I have got the measure of what I need to do.  Hopefully, I will get an evening this week to finish it off.  I am keen to develop my rust weathering skills further.  Being a steel open wagon, this is going to serve as a test bed for developing some better rust weathering skills.

Slaters 0 Gauge 13T wagon heading towards completion (finally!)

My old man has also recently got into 0 gauge. I got him a skill builder etched brass kit the Xmas before last and once built, I offered to paint it for him.  I am keen to develop my wood weathering skills, so this wagon is going to be a test bed for some advanced weathering (or at least I hope so).  It is shaping up nicely so far, although there is a long way to go yet.  I have purchased the AK International wood weathering kit for this and it will serve as a test best for these techniques.


My dads 0 Gauge LNER Lowmac going through the paint shop.

A wagon that has been finally constructed this weekend, is an 00 gauge SR 40T ballast wagon.  This complements the 2 recently finished Walrus wagons, all constructed from the Cambrian kits.  The SR 40T wagon is not one of my best builds, it is a bit wonky!  However, I hope that a good paint job will disguise the building sins!  This is a quick build, taking a little over a year!


SR 40T ballast wagon heading for the paintshop.

Last up, is a much quicker fix!  It is a Hornby LNER CCT.  This is yet another parcels wagon for the layout.  I converted this to 3 link couplings and it is now ready for the paintshop, after a wash.

Ready for painting - yet more parcels stock.

So plenty of progress and it feels very satisfying.  I have also sorted out the paint boxes this weekend and a number of models are very close to completion.  I am determined to not buy any more stock at the moment.  I have lots of kits to build and lots of stock to weather!  I also have all the new baseboards for the next layout ordered.  So I want to work through everything I have right now, this includes finishing off a DC kits class 119 DMU, sound chipping and detailing a BR blue class 108 DMU, detailing and sound chipping a Hymek, Western, Class 42 and Class 43, and maybe even sorting out my Lima class 37.   Hopefully, plenty of more progress over the weeks ahead....although whether I will finish all of these projects before being distracted is open to question!

Sunday 17 January 2021

Class 45 (revised!!!) - DCC sound and running!

A couple of years ago, I posted on here about the destruction of a Bachmann Class 45 at an exhibition.  A lady pushing a wheelchair smashed into the layout and sent the locomotive crashing into a concrete floor. It taught me that I need a guard on the side of the fiddleyard to stop this happening again.  I did half heartedly attempt to fix the Class 45, but it was a big job and I felt I could do a better finish on the weathering, as the original Class 45 was an early attempt.  I managed to get a new Class 45 from ebay and over the last year or so I have been detailing this.

Finished class 45 on Charlton.

Class 45 on a short engineers train at Charlton.

I took the DCC sound chip (Howes) out of the class 45 and added in a double IPhone speaker from Road and Rails.  I also used the original bogies from the older class 45, but otherwise it is the new model.  As always, I detailed the body using an airbrush and Railmatch enamel paints.  I initially used an overall body wash of paint, applied with a paintbrush, wiping most of it away, before airbrushing in some shades of faded BR blue.  After this, the weathering was applied, using sleeper grime, weathered black, frame dirt, roof dirt, brake dust and a splash of white.  

Spotted between the foliage.

The short engineers train, with a GWR Mink and Python, with a SR CCT, all in olive green!

The locomotive from ebay was not very well run in and it took a little bit of cajoling to get it running properly.  However, it is all moving fine now and earlier today I used it with the recently finished engineers wagons in a short formation.  

A short video of the Class 45 heading out of Charlton and onto Barnstaple Junction.

In other news, I have decided I am going to sell the Charlton layout.  It is definitely time for a new project -  so if anyone is interested please drop me a message here. 

Sunday 10 January 2021

GWR Python wagon in the engineers train

A happy new year one and all!  With all the seasonal festivities over, I have managed to find some time to crack on with some modelling.  This week I put the final coats of varnish on a GWR Python wagon, in service with the engineers dept.  It really is a bit of a work of fiction, like the recently finished GWR Mink wagon.  However, a little peruse of various internet websites shows some use of GWR trucks in the engineers fleet well into the 1970s/1980s and that is close enough for me.

Finished GWR Python wagon in BR engineering olive.

The model was painted with Railmatch enamels via an airbrush, and finished with Modelmaster decals.  It carries 3 link couplings, as per all my stock.  Whilst I love the Parkside range of kits, I found this model to be a bit of a stinker to build.  Whilst many of the Parkside kits literally fall together, I found this one trick to get square.  The wheels are a bit tight, it runs ok but not brilliantly.  However, it does add some further variety into the engineers train I am currently building, with a Mk1 in dept olive ready for its final coats of varnish over the coming days.  Today I am also putting my class 45 back together and adding the DCC sound chip and speaker.  So hopefully by the end of today I will have the class 45 operational again.  I also managed to get the baseboard built for the first layout on the new station, so all in all some progress his week!