Pages

Tuesday 26 December 2017

Charlton Micro layout - further progress

A short update on the developing micro layout that I am  building.  I have nearly finished all of the boring jobs!  Not quite, but a large amount of progress has been made.  The back scenes are now all attached and require painting. Given the narrow width of the of the baseboards (1ft) it would have taken too much space to have a curving backboard, so I have settled with 90 degree angle in each corner.  Not ideal but I hope I will be able to disguise it.

Back scenes in place, ready for painting


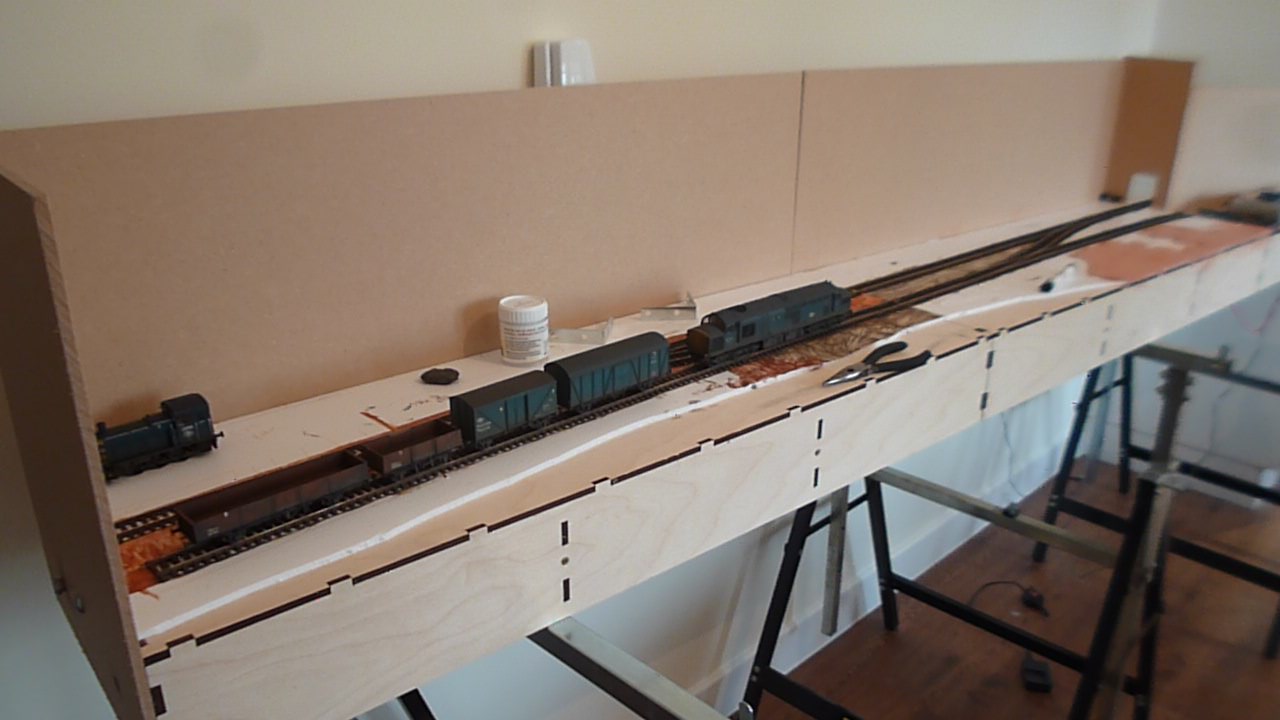
General overview of the micro

The fiddle yard has been built and has a small area for continuation of a siding on the scenic side at the front. Being only 3ft long it is a very tight fit.  The entrance to the fiddle yard is a thin piece of back scene with a small hole cut into it (obviously!).  Rather than have a tunnel I am going to try to disguise this as much as possible, but not worry too much about it. The powerbus has been extended under the fiddle yard and some track has been temporarily laid down.

The small entrance to the fiddle yard

So now there are two last jobs.  The first is to install the point motors, I am using the Gaugemaster PM10s with frog juicers.  A simple fix for a small DCC layout and all seems to be working well.  The CDU is installed and it is just a case of placing the motors under the boards and wiring them up - although this is a pet hate of mine!  The second thing to do is is lay two sets of points into the fiddle yard and glue these down properly.  Just one more weekend of soldering and fixing and then the whole layout should be 100% operational!
  
Just testing out some the positioning of the buildings....

So time for the buildings.  I have some resin buildings to use, and these will be supplemented with a bit of basic scratchbuilding.  I am not great at making buildings, so each attempt gets a little bit better.  I have to make the station, which is a job to start at the end of next week.  However, I am pretty happy with the current level of progress and my aim is to finish the layout by the end of February.  I had originally gone for a Christmas date - but that now seems unduly optimistic.  The great thing about small layouts is that you can seem to make progress quickly!

A quick video of the layout working....

Now to get some type 2 sound decoders to run on a class 22 and 25.  I have finished the western.....now I wonder about a warship......this layout is definitely going to be pure BR blue and plenty of sound....

Monday 25 December 2017

Merry Christmas

Wishing everyone a very Merry Christmas

See you in the new year

Saturday 9 December 2017

The western front - Heljan class 52 ready for service

I have finally just about to managed to finish off the Western detailing project I have been working on for a while (2 years or so!!).  It has been a really fun project and overall I am pretty happy with how it has turned out.  However, the longevity of the project and the stop/start nature of it meant that I lost some of the parts along the way, as well as a bit of momentum.


The finished locomotive running around the microlayout.

The locomotive is for use on the my Devon based withered arm layouts, that are struggling through the 1970s.  The model is the Heljan version, which I think is an excellent model by and large.  I replaced the original wheels with Ultrascale versions which has improved the running characteristics of the locomotive no end.  All painting and weathering was done with railmatch enamels via the air brush.  Faded blue was spayed on the body, as well as matt white from a paintbrush to replicate paint chips.The model has been fitted with a loksound decoder, with the Howes sound files.  I really like the Howe sound recordings on this one - I think it sounds it great, although I will turn the volume down a bit to about 75% of its current level when I have the track operational on the new Charlton micro layout.  I attempted to model the locomotive towards the end of its working life and it is therefore pretty grimy.


The finished locomotive posed on the micro layout.

Jobs that have been finished off this week are the adding of windscreen wipers, some detailing of the windscreens and a bit of wheel painting and then cleaning.  Small jobs that do make a big difference.  So below are some finished photographs of the Western.  I have also included some photographs of the locomotive in its various stages of painting and detailing.

The cab showing the weathered front.

With the lights working.

Body side, showing faded paint and open windows.

Detail of the bodywork a bit closer up.

The body shell during painting and weathering from the airbrush.

Reassembled locomotive, before final detailing.

The first stage of weathering involved splashing white paint over the body work and then hand brushing some grime over the body, before wiping some of it off with cotton buds.


As it looked from the box, a second hand model.


Thursday 30 November 2017

Micro layout progress

Over the weekend I have made some progress on laying the track on the micro layout and getting it all soldered up ready to go.  I now always use electrofrog points on my layouts, as I run all my layouts via DCC.  This time I have added gaugemaster point juicers to the electrofrogs and I am really impressed with how they work.  This takes the pain out of wiring up seep motors and positioning them almost perfectly so they make a full throw and switch polarity.

Underneath - using the Express Models powerbus kit

Under the baseboard is the Express Models powerbus kit, which is really easy to use and this time I have kept the wiring relatively neat - I have even used a colour coding of sorts!  A job for this weekend is to fit some underboard point motors and build a control panel.  I still have to get the backscenes sorted and I have only just ordered the final baseboard for the fiddle yard, although this might also have a small scenic section on it.  I am waiting for the final baseboard to arrive before sizing it up to see exactly what I want to do with it.  I also need to order a couple of stands, to be able to set the layout up with out using my table!

Full view of the layout so far

It is great to have somewhere to run trains again, although it is very limited what running I can do without the fiddle yard in place.   However, with the western just about finished it is great to have somewhere to put this through its paces and listen to it idle away.  I am going to make a start on building the station to this weekend and have been collecting a few bits and bobs ready to detail the layout.  I am hoping to have a big push on doing the scenery over the xmas break, so want to get all the boring bits (point motors, back scene, etc) finished to be able to spend time detailing the layout.


The first trains are running on the layout!

Thursday 23 November 2017

13t Open wagon ready for service

Well there has been a little bit more progress on the modelling front with another wagon for the layout.  This is a 13t open wagon with corrugated ends, which is built from the rather excellent Parkside kit.  It has H&A steel buffer heads and model master transfers.  This one is set for revenue earning service unlike the last one, which is was finished for the engineers department.  I have a couple more of these to build, but I have halted any more wagon building until the layout is operational and I have cleared the painting on a a back log of built but unpainted wagons.  Currently in the paintshop is a dance hall brake van, a grampus wagon, a tunny wagon, a dogfish wagon, a LMS CCT, a Western, class 31, a ratio 13t open wagon and a plate wagon.  I can't keep track!

However, I will soon have somewhere to run these wagons with the track laid on the micro layout and a fiddle yard ordered.  The weekend is going to be spent soldering this up and starting to place some of the key elements of the layout.  All in all steady if not slow progress, but the aim is to have the micro layout in full flow by the xmas break, whilst Pottington Quay remains in storage.  Hopefully I can retrieve Pottington in the new year.  Until then I have plenty to keep me going!
  
13t open wagon with corrugate ends, finished in a later bauxite livery.

Note a great photo, but the corrugated ends are clearly visible.


Sunday 12 November 2017

22t tube wagon ready to rolll

Having returned from the Med with work late this week I have achieved very little modelling.  However, I did manage to find a couple of spare hours on Saturday morning to finish off a 22t tube wagon.  I think that this wagon has been built over two years and it is great to see it finally finished off.  I attempted to model some replacement planks in the painting of the model, with a weathered bauxite finish.  Although I sealed the wagon with Railmatch matt varnish, the overall effect is more a satin finish.  The weathered finish is quite dark overall, but overall I reasonably happy with how it turned out and I am looking forward to running it on the layout.  This week will see the commencement of track laying on the second board of the new micro layout.  More updates to follow.

Another wagon finished, posed on the developing micro layout.

Saturday 28 October 2017

A bit more Western Progress and a VEA wagon

There has been very little modelling over the last couple of weeks, partly due to a lack of time and a nasty bug did not help my motivation.  However, a couple of projects have crept forwards.  The first up is a VEA wagon which has finally been finished, which I think has taken over 3 years from building to finally adding the transfers.  This is the second of 3 VEA wagons for the layout that has been finished.  I only used microsol/set for the transfer application and I am really happy with the application.

Finished VEA van.

The Western has also seen a bit of further progress. I added the footsteps to the chassis before re-adding the body shell, and I must confess I found them baffling.  I had to substantially shorten them, to stop them fouling the bogies, which made them too wide for the body shell.  This means the body shell now sticks out too far on the chassis.  This requires the footsteps to be sanded down a little, before this locomotive is finally finished.  However, it is starting to shape up and just requires this modification to the footsteps and the wheels to be painted before this is finished.  I have also made a start on the new layout, with some of the track cut to size and the power bus installed.  However, everything is now on hold as I head to Greece for a couple of weeks with work.  I intend to source all the parts for the layout for when I return, so hopefully I can spend a weekend wiring the new layout up when I get back. 

The western with the body shell added.  Those wheels need toning down.


The reassembled Western.

Thursday 12 October 2017

A good rear end! A 20t brake van

Over the last couple of weeks I have been weathering a Hornby Brake Van.  Having finished this project off today I thought I would post a few images of the process of creating this wagon.  Now whilst I do not consider my modelling to be anywhere near perfect, I though it would be interesting to take photographs of the project over different stages of the process and see how they contribute to the final model.  A spanner was thrown into the works when I thought I had finished the wagon I gave it a blast of humbrol matt varnish and it immediately produced a very white finish over the paint work.  This required further coats of varnish and various weathering shades to tone it down, and hence the finish was slightly heavier than I was intending.  All of the painting was undertaken with an air brush and using railmatch enamel shades.  One slight regret is I did not fit a working tail lamp, but taking the wagon apart to fit the the 3 link couplings was such a headache with the hand rails that I cannot be bothered to open it up again.  I have a Bachmann version to do, and I intend to fit a tail lamp on this next one.  All in all I am pretty happy with this wagon and looking forward to it earning its keep on Charlton when this becomes operational.  

First up I added some splatters of white paint, to represent chipped paintwork.


I dipped a cotton bud in some white spirit and toned down the effect of the white paint, removing some of it.

A diluted wash of weathered black and frame dirt was hand brushed over the wagon.

Various shades of sleeper grime, frame dirt and weathered black were spayed over the brake van.

Some light rust was added to some of the metal components of the wagon, including the duckets.

The wagon was then treated to some further shades of frame dirt and sleeper grime to blend all the various components together.

Finished with several sealing coats of railmatch matt varnish.

Sunday 8 October 2017

A new micro-layout begins

This week a lovely parcel arrived from Tim Horn baseboards (http://www.timhorn.co.uk/) containing two sets of baseboards.  The first set of baseboards is for a small micro I intend to build between now and xmas.  Both boards are 3ft by 1ft and will be used to build a small station, which was originally a through station, but is now the terminus of a truncated branch in North Devon.  I intend to use up lots of odds and sods on this build, stuff that has been hanging around in modelling boxes for ages, but has never been used.  
The basic track plan for the new micro-layout.

The layout will have a small loop, and siding for a provender store.  I am currently missing one point to be able to get the track work down fixed down, but have pretty much everything else I need, bar a few connectors for the power bus.  One issue with the small size of the baseboards is that the station will have to be built over the baseboard join, something I was keen to avoid. I will just cross that bridge when I get to it.

Provender store and goods wagon.


The provender store is resin model from Bachmann, something I had forgotten I owned.  I figure this will be used to unload fertiliser from 12t vans, something that used to happen at Barnstaple.  Other traffic will be china clay and also milk (ala Meeth/Torrington).  Pictured in front of this is a goods wagon I finished off this week, with some detailing and a coupling change, to 3 link couplings.  A quick and satisfying bit of modelling.  The heljan western is also making some progress, and maybe, just maybe I will finish that model off this week....

Thursday 5 October 2017

It is now a bit more noisy on the western front....Heljan Class 52 upddate

Several months ago I posted an update on the detailing of my class 52 Heljan Western.  The body shell and chassis had been largely painted and weathered, and I was waiting for a replacement set of Ultrascale wheel sets to arrive.  The project stalled at this point and has been sat in a box since.  However, with the delivery of the Ultrascale wheels, the project has seen some progress this week.

All the component parts ready to be put back together.

Fitting in the new wheels was a piece of cake and this has improved the running characteristics of the locomotive no end. The cabs and cab glazing have been re-attached to the body and handrails to the front of the cab.  When reassembling the locomotive I found out that I had misplaced the body side glazing pieces.  This was really annoying and try as I might I could not re-locate them.  However, this could be an advantage, as I now plan to make some replacement glazing and model the body side windows open.

Sound decoder and speaker in place.

The advantage of some open windows is because I have fitted a Howes ESU sound decoder to the locomotive.  Having some of windows open will allow the sound to escape the body shell.  I used a relatively small speaker which I glued to a piece of plasticard which has been glued to the body shell.  I have yet to check it all fits back together ok, but the plasticard has only been lightly glued into place, so there is some wiggle room here.  The smaller speaker reproduces the sound pretty well, but it is not too loud, which I think is a nice balance.  The Howes sound recordings are excellent and fitting the sound decoder was a simple job.  The only slightly tricky bit is fitting a new speaker, as the speaker the decoder is supplied with requires cutting off and being replaced with a new one.


Sounding good!

So now into the final jobs on the locomotive.  Colour the wheels, add the windscreen wipers, replace the glazing, put it all back together then blend the two halves back together with a final bit of weathering.  Hopefully one to be finished this week......

Sunday 1 October 2017

13t wagon for the engineers department

Some good progress has been made this week on the modelling front, with a few wagons being finished off in the paint shop.  These wagons have been built for some time (I think in 2014) and have been lying around in a box unpainted - it is funny how quickly time flies by!  So this week I made a concerted effort to finish at least some of them.  So first up is one of a pair of 13t open wagons with corrugated ends, built from the Parkside kit.  Normal metal buffers and 3 link couplings have been added, with transfers from modelmaster.  This one has been finished in engineers olive and has been seconded to the engineers department.


On the layout front with Pottington Quay still in storage the new baseboards have been ordered and are due to arrive this Wednesday.  So exciting times ahead this week for starting a new layout.

Saturday 16 September 2017

Back again and a LMS CCT in BR blue

The long silence has ended and I am back in the world of blogging and modelling.  We have moved again but this time we should stay put for a bit longer.  The modelling room has been part way set up and the air brush is working again.  I unpacked some boxes and found a set of half finished projects. The first off the mark was this LMS CCT finished in BR Blue, another wagon to add to the ever growing parcels stock.  This just needed a blast of varnish to seal the transfers in.  All in all I am pretty happy with this one.
Finished LMS CCT reading for running in the parcels train.


As for the layout, Pottington Quay was making significant progress towards completion, when it was placed back into storage, and unfortunately it is still there.  Whilst that was a great project and I learnt a lot from doing it, there were several issues with the layout.  The principle issue was the size of the scenic board, which was 5ft by 2.5ft.  This was quite heavy to move around and really a two person move.  I was also not happy with wiring for the points and this all needed replacing/tidying up.  So after some thought I decided to leave it in storage for the time being.  Also as the storage depot is 250 miles from where we now live it is a one trip job to collect it.  

Consequently, I have ordered some much better baseboards from Tim Horn for a smaller micro project.  The idea with this is to complete a small layout before xmas (we shall see), but have this as a layout that can link up to Pottington Quay further down the line.  The other key aspect of this layout is to be small and portable, allowing me to take it so some exhibitions.  So from now till xmas I hope to be able to finish this layout and get some trains running.....well that is the idea anyhow!


Tuesday 2 May 2017

Adventures in superstrip

A long time since my last post and not much has happened in the way of modelling.  This seems to be a common way to start a lot of my posts.  Modelling is firmly on the back burner, following a house move (again).  Pottington Quay has headed back into storage and for the time being there is little opportunity to play trains or do much modelling, with the air brush also put away.  A lot of work and travel in the next few months means there is little chance of any modelling.  I am hoping to be able to pick up modelling again later in summer/autumn.

Paint brush finish on the Walrus, the overall thickness of paint is too thick.  

Before we moved I placed some of my first attempts at painting into a bath of superstrip.  A salmon wagon, lamprey wagon and walrus wagon were some of my first attempts at painting, using brushes, rather than an air brush.  The paint finish on all of these wagons was far too thick and I decided that it was high time to give these wagon builds a better paint job.  The walrus wagon was a real pig to do, with a lot of detail hidden away in the build.  Getting all of the pain out meant a lot of the plastic detail snapped and this wagon ended up in the bin.  So two of the next builds will be walrus wagons, to replace this lost one and provide a further example for a three wagon rake along with the Bachmann sealion wagons.  The lamprey wagon and salmon wagon were much easier to clean up and are ready for a blast of primer when I get the air brush up and running.

My first attempt at a locomotive repaint - on my old Pottington Quay micro layout

Another model to be added to the superstrip was my first attempt at repainting a full locomotive; a Bachmann class 25.  This first attempt I was happy with at the time, although the weathering job was very heavy handed.  However, as I have got more experienced in painting I have been meaning to replace this model.  So this is currently being tidied up on the odd evening I have some free time for modelling.  Some of the paint was not removed by the superstrip, so some careful tidying up is being undertaken with files and sand papers.  I am not sure why the odd blob of paint has hung on to the body so well, whilst the rest has been removed.  Anyhow, this will be one the of first jobs in the paint shop when everything is up and running again.....


The same locomotive now in the process of paint stripping.

Monday 6 March 2017

13t open wagon and layout electrofrog points

Not a lot has happened in the last few weeks - the layout has been static and I have been busy.  Unfortunately, we are having to move house again (don't ask!!) - which is not a bad thing overall but it means the layout has to head back into storage for a period of time.  This is frustrating, as much of the boring work has been completed, with the track painted and wired up. Since painting the track the layout has been live again, but there are a few gremlins in the wiring to sort out.  Two of the elctrofrogs need to have their bridging contacts resoldered, which whilst not the end of the world is a pain, as the track is now pinned down.  One of the Seep point motors has given up (faulting passing switch), but this just involves an underboard switch.  Lastly, one section of rail needs some new dropper wires soldered.  These are of course all minor points and easily resolved, I just need a free evening with the soldering iron, but it does also mean 3 of the four points are no longer operational.


I have also finished another wagon, this time a 13t goods open wagon, the steel bodied Parkside kit. This has been finished in a generic bauxite colour with some light weathering and I am pretty happy with how this one turned out.   So a few pictures of this on the layout, in a engineers train with a warus, whale and shark wagon, behind a class 25.  


Sunday 29 January 2017

A bit more layout progress

So a busy January period has put pay to most modelling this month.  The layout progress is creeping along, but it does feel like it is creeping.  The track has painted, which was a laborious job.  The platform has been glued in place, but there is work to do with the final painting of this, it is still not quite right.
The developing scene from the mudflats showing the platform behind.


Wider view of the mudflats/quay wall looking to the platform.


Plan view.

I have drilled the holes for some yard lamps and also added some scatter to the mudflats to represent sediment.  This now needs to hold some scenic water, although I have so far poured on quite a lot of scenic water and it just seems to have been absorbed by the scatter!!  I also need to visit the beach to pick up some sand, this will be used to attempt toe recreate an area by the quayside similar to a rough road/yard.

View down the platform.

View from the other edge of the mudflats.

So all in all some progress, but it seems a very slow project at the moment. I am hoping the pace will pick up once I get the track ballasted.