Pages

Friday, 29 January 2016

More parcels stock - Plywood sides CCT

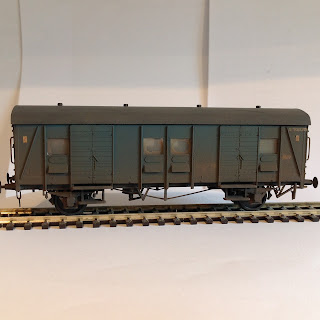
Another wagon for the Pottington Quay parcels train has made it out of the workshops.  This time a mixed plywood/planked CCT, finished in a faded grubby BR blue livery.  I really enjoyed the painting on this, mixing various shades of BR blue together and patch painting the body.  I added in the windows and then gave them a clean to represent a part cleaned window on a grubby CCT.  Unfortunately, I am not that happy with the outcome of this one.  There is poor transfer application (my fault again!) and an ill fitting roof, both of which I find slightly annoying.  As mentioned on my last post, I have not paid enough attention to the fitting of the roofs on these CCT kits prior to painting and this is something I will definitely work on on future builds.  The windows are not great either - I did not use glue and glaze on either CCT, and regret this.  It is a funny thing about modelling, you put a lot of time and effort into finishing something, and all you can see are the imperfections!  
The faded BR blue over the black pres-shading.

As time is at premium at the moment, I am going to wrap it up in box, put it into storage with a number of other wagons and when Pottington Quay is finally resurrected, I will decide what to do with it.  It is ok for now, but I think in the fullness of time I will strip it down and start the paint job again.  Until then, it will be ok in the mixed rake of parcels stock, and probably in time I will forget about the bits I do not like and never get around to correcting it!!

Finished CCT - with some minor niggles...

Friday, 22 January 2016

Parcels stock continued - 12t Express Parcels van


After finishing the CCT in the last post, I positioned it next to the 12t parcels van I finished a few weeks ago and the poor transfers were all to evident for me to see.  Noticing this I took the 12t parcels van back into the workshop and gave it a much heavier weathering in order to disguise the transfers. This seems to have been successful, in that the silvering on the transfers has now disappeared., although I am annoyed my poor transfer application meant this had to happen in the first place.
Anyhow, these are the first wagons for the parcels train finished.  I have the Hornby SPV in the paintshop at the moment and another CCT has had its final varnish coat applied, so it is now ready too - I will post it on here later next week.  I have two more 12t fish wagons built and ready for painting and the new Bachmann CCT sat ready to have its couplings converted.  I might just build that BY wagon I have had sat around for ages this weekend and purchase a couple more CCTs to build and then that will be enough for my Pottington Quay layout.


Sunday, 17 January 2016

CCT in BR Blue

After the 12t fish wagon was finished as a SPV parcels wagon, the second of the wagons for the parcels service is ready for action.  This time it is a BR blue CCT.  This is the basic Parskide kit for the uneven plank southern CCT. The only additions to the original kit are the correct buffers and the fitting of 3 link couplings.


As mentioned elsewhere on my blog, my son I started building this kit together several years ago (when he still played with trains!), but he has now grown out of this, having hit his young adult years.  So I rescued this from the part finished box and completed it over xmas.  The finish has a lovely variation to the blue, with a variety of coats of different blue coming together.  The transfers also went on this one pretty well and all in all I am pretty pleased with how it turned out.  The transfers are a little bit of a flight of fancy, as I could not find the correct ones in the Modelmaster range for blue CCTs.  However, I have just found out that Railtec do the correct transfers, so on the next batch of CCTs I will use their transfers


I realised that when building these kits I rely on the roof to automatically be a perfect fit.  As I do not glue the roof on until I finish the paint job on the van body, I often do not notice this until too late in the day.  The roof on this van is a bit of a niggly fit and I wish I had known this at the building stage. However, it is ok and not that noticible, so I will go with it for now and make sure I pay more attention to this when I build a few more of these kits in the coming months.


As for the first SPV I decided I could not stand the awful silvering of the transfers, so it is currently back in the paintshop having more muck sprayed over it, to cover up that poor finish.  I will hopefully have this finished next week.  Finshing a couple of wagons in 00 gauge has cerainly whetted my appetite for modelling in this scale again and I am keen to get some more wagons painted and finished.

Saturday, 9 January 2016

0 gauge Grampus - some rusty thoughts

Well it was back to work with a thud this week, after enjoying a lovely extended xmas break and equally relaxing start to the new year.  With plenty of time off I started to make some real progress on  the long list of ongoing, unfinished, projects.  Two projects that made some real headway were the 0 gauge 13t sand wagon and the 0 gauge grampus wagon.

The first finished 0 gauge kit

The 0 gauge grampus wagon is now finished. I tried to create a well worn rusty look to the wagon, through multiple passes with the airbrush and lots of weathering.  The result I am reasonably happy with, I think it looks like a grampus wagon.  However, the more I was working on the body for this, the less happy I was with my rendition of a rust-effect on the wagon sides.


Part of my dissatisfaction for the rust appearances I am creating is the lack of relief that is caused by the use of airbrushed paints when simulating rust patches.  So I have started some experiments with the new Noch scenic rust kit.  I plastered this over a corrugated model roof this morning and am waiting to see the results.  I want to apply it to this wagon, but am worried about ruining the finish, so I am going to put the grampus in the  finished box and maybe return to it in a few months.


Consequently, I am considering applying the scenic rust to the sand wagon, which is having its first coats of varnish ready for the transfers.  It seems to me that to get the best out of the scenic rust you need to use it in a moderate way and work this into the painting of the wagon.  It also seems too coarse for 4mm, so I am going to build an 0 gauge Slaters 13t steel open or a Parkside 16t mineral wagon and have an experiment on this.  I think that I need to be confident about applying it before I use it on finished kits.

However, my first 0 gauge wagon rolls out of the workshop and I am delighted with it.  The detail and painting is fantastic and I already have backlog of 0 gauge kits to build and others ready for the paintshop.  The 0 gauge bug has well and truly bitten, and I think that I am looking more and more to 0 gauge.  In fact, I have an awful lot of 00 gauge stock in boxes in storage and I am considering selling some of this to fund further 0 gauge purchases, not least a JLTRT class 33....an 0 gauge shunting plank is definitely on the way.