Monday, 26 March 2018

Parkside 12t Pipe wagon

Finished 12t pipe wagon being shunted around the Charlton micro layout by a Class 31.

The stock for the Charlton layout continues to grow and I recently managed to finish off a 12t Pipe wagon, built from a Parkside kit.  The wagon is finished in bauxite and has had some obligatory replacement planks painted on.  Everything had progressed fairly smoothly with this one, until the transfers stage.  I used the CCT transfers for this wagon, and these transfers are excellent.  However, I would suggest that they are also slightly more delicate that modelmaster ones, which I am more used too.  When I tried to hand brush a sealing coat of varnish on top of the decals I partly disturbed them, which is a little bit annoying.  Anyhow, I can live with it (it is a lesson learnt) and another piece of rolling stock for the layout.  This is another one of those projects that has hung around for years partly finished and it is great to have finally completed it.  On the layout front, I have a week off work coming up and I intend to largely finish off the scenery side of layout.  More updates to follow on this later!

Saturday, 17 March 2018

Hornby Class 31 with TTS sound - weathered and in service (somehow!)

Over the last week I finished off a slow burner of a project - weathering and sound fitting a class 31.  The model is the newer Hornby model, finished in BR blue with a factory applied weathering.  I thought it would be a relatively quick job to weather this locomotive and test out the new Hornby TTS sound decoder range - well how wrong can you be!!!  When I first ran the model fresh from its packaging it was awful, and I discovered one of the pick up wires had a broken soldered joint.  It was at this point I became familiar with the Hornby design for the bogies, with split side frames - this is a bonkers arrangement and it extremely fiddly to take apart.  The solebars seem very flexible to me and I am sure they have warped a little bit.  Talk about reinventing the wheel for this arrangement, I do not think this is a very clever design at all and would prefer a more sturdy bogie.
The finished project standing at Charton station, with a short train of intercity liveried mk1 coaches.

I weathered the solebars first, using various shades of weathered black, rust, brake dust, frame dirt and sleeper grime, before resoldering the droppers and reassembling each bogie.   The next issue was the sound decoded was not going to fit with the fan in place, so this had to be removed from the locomotive and binned.  Once removed the TTS sound decoder was fitted for a test run.   It was just rubbish! Running was jerky and all over the place.  So I switched the decoder over for a standard Bachmann 8 pin decoder and it ran like a dream.  It was obvious the TTS decoder was faulty and a bit of reading on the rmweb revealed this to be a common fault - so I sent it back and duly got a replacment.
Side on view of the finished weathering - the variation on the solebars shows up well in this image.

Whilst waiting for the replacement decoder I masked off the two bogies and added the detailing pack to both ends.  This is where I encountered my next problem.  I attempted to fit 3 link couplings and found a solid lump of metal sat straight behind the buffer beam!  The coupling supplied in the detailing pack is a fairly sturdy metal one, so I super glued this into place to use with 3 link couplings.  I then set about dismantling the body of the locomotive, removing the glazing, etc, and weathered the body and the chassis separately.

Here the faded yellow and buffer beam detailing can be seen, included the original coupling.


To the chassis I applied various shades of weathered black, sleeper grime and frame dirt from an airbrush.  I wanted to achieve a subtle weathered finish on this one, with a bit of faded blue, but not with chipped paint.  For the body I applied some streaks of faded rail blue on the sides and some faded yellow on the cab ends, supplemented by some weathered black, again streaking the body and also around the grills.  For this streaking I used a finer 0.3mm air brush that I have recently acquired, from the Iwata Neon range.  After this I applied a thinned wash of frame dirt and weathered black over the whole body, allowing it to enter into all the nooks and crannies before wiping most of it away.  Following this the body had a few more light passes of sleeper grime, weathered black and frame dirt added.


Some of the first streaks of faded blue on the side of the body.

A bit of faded yellow on the front.

Some of the finer streaks of weathered black, before more weathering using sleeper grime and frame dirt.

The all over wash, showing it applied one the right, with some of it washed away on the left.

Once the masking was all removed I fitted the TTS sound decoder and speaker, which is an extremely tight squeeze even with the fan removed.  However, I managed to get it all to fit and reattached the body to the chassis.  Feeling rather pleased with myself I fired it up for the first time.  Again the running from the TTS decoder was poor, although not as bad as the first time with a faulty decoder. Some googling found out some possible fixes to get rid of the erratic running.  It turns out there are two motor settings on the decoder, one is for very slow speed shunting, with the fine motor control being outstanding on this mode.  However, the problem is even at full speed it is only going a scale 7mph!  The other motor setting is for normal running and the factory settings here still provide a poor performance.  Even with some tweaking of the original CV settings for the motor parameters, it still provides a coarse overall performance compared to other decoders.

Running into the station and this is at full speed!

So over the to the sound settings.  For £40 it is under half of the price of good quality sound chip - and quite frankly it shows!  There is no automatic braking squeal when it is slowing to a halt, and the start up and horn sounds are quite basic.  However, the motor idle and acceleration are pretty pleasing. I was quite keen to experiment with TTS sound when it came out.  However, the outcome of this model has produced something that will only run well at a crawl, and sounds ok.  Next time I would rather save up for a Howes decoder and I suspect I will probably replace this TTS decoder in due course.  On another note, I am really chuffed with how the weathering turned out on this one.  To my eyes it certainly looks the part, but probably does not quite sound the part (yet!).  I must say that for Hornby products I am left less than impressed, both in the design of the locomotive (solebars on the bogies) and the TTS decoder.  As for the sounds - see below and judge for yourself!

Start up out of the station - which is definitely the best sequence from the TTS decoder.


Sunday, 11 March 2018

GWR tunny wagon at Charlton

This weekend saw the finishing off of a GWR tunny wagon, ready for service in the ever growing engineering department.  This is a Chivers fineline wagon, which I built several years ago, but has languished around requiring painting.  It was painted in my normal way, using an airbrush and railmatch enamels.  The transfers are from the excellent CCT range and it has been fitted with 3 link couplings.  It is great to see another wagon finished.

Finshed GWR tunny wagon on the Charlton layout.

At the station.

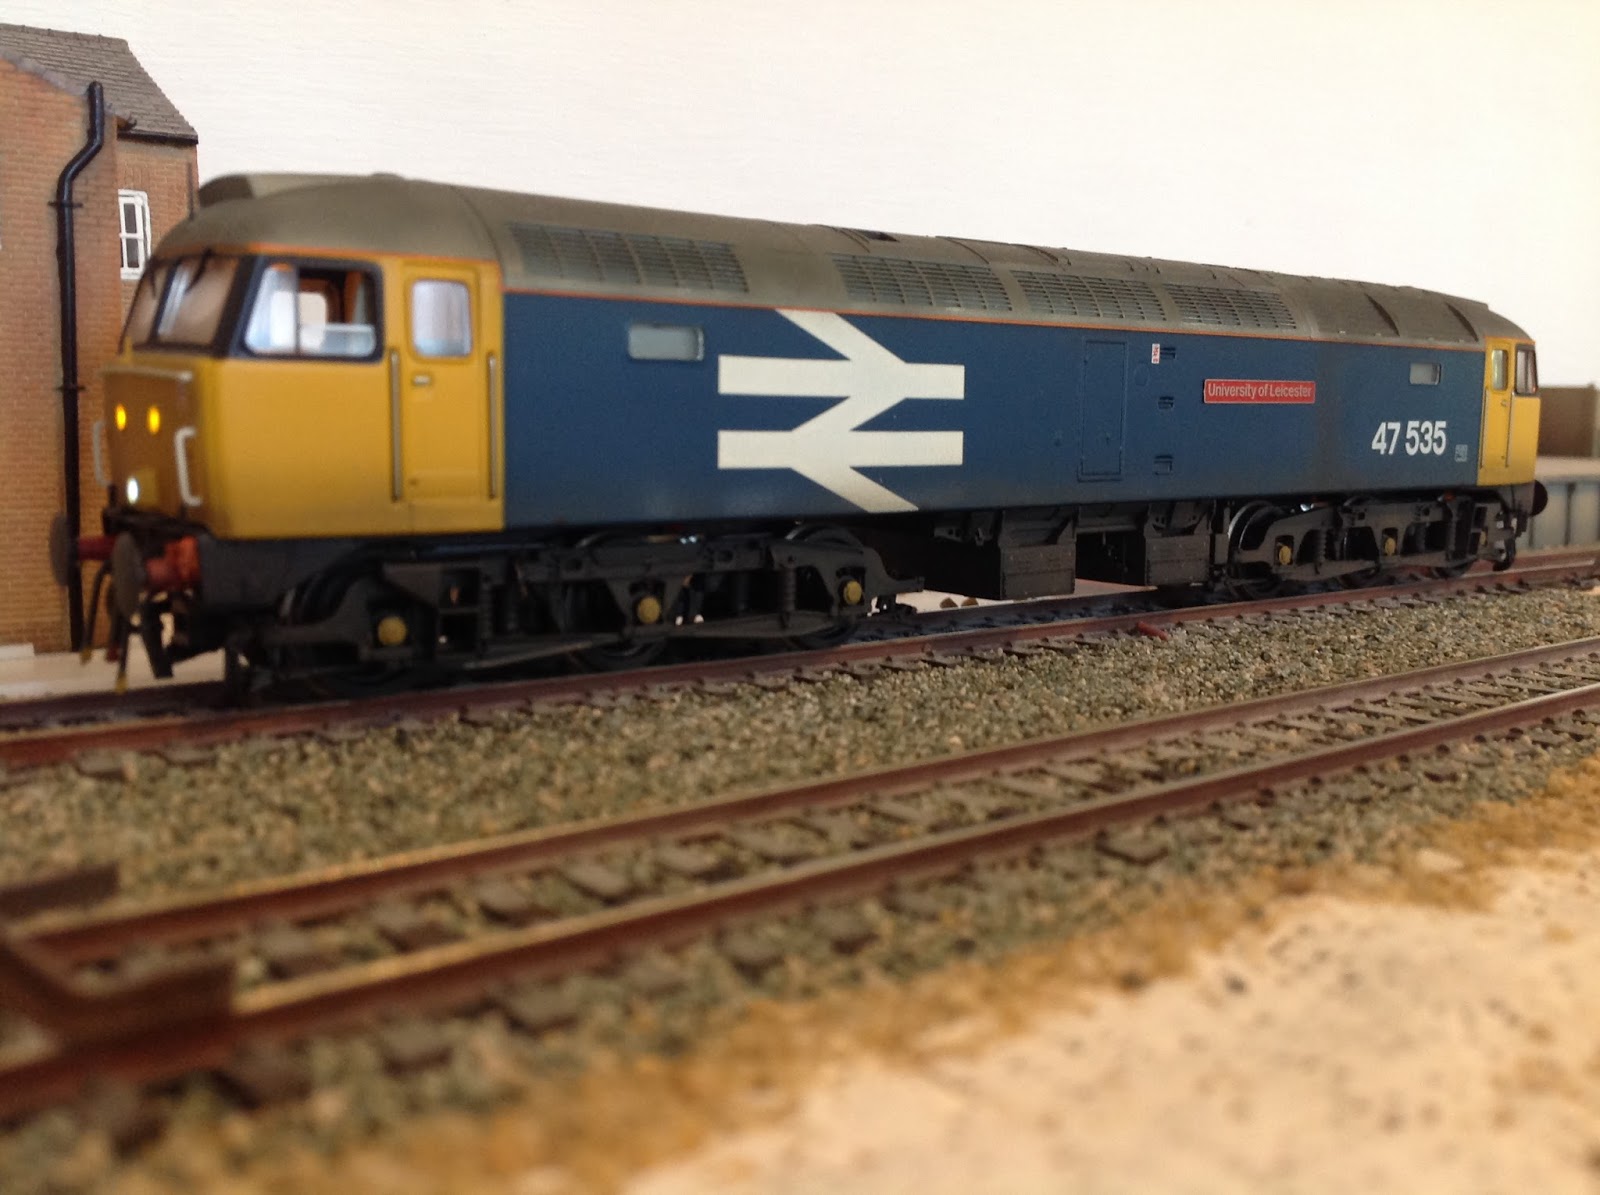
Being shunted by a large logo class 47.

Other than this there has been little progress on the layout, with the coming week looking very busy too.  However, with Easter fast approaching I hope to get a bit of time to finish the detailing on the layout.

Sunday, 4 March 2018

Charlotn Micro Layout - another update

This week has seen some sporadic progress on the Charlton micro layout.  I am taking a creeping barrage approach to the detailing, taking it a little bit at a time.  The ballasting is all but finished - there are one or two bald spots that need touching up, but other than this it is done.  Some light sand has been added to the front of the line, to blend the line into the surrounding scenery.  The front of the layout has seen some plaster added, with a change of gradient right at the front of the layout dropping onto the floodplain.
The gradient to the lower floodplain is just about visible at the front of the layout.


I am starting the detailing at the far end of the layout.  With the buffer stops added at this end, two terraced houses will be at the end of the layout, next to the station car park.  The terraced houses are a Bachmann low relief building, which is to be set onto a piece of plasticard with the gardens detailed.  Last night I knocked up the gardens from odds and sods and have started painting this today. The houses will have an interior light added in due course.  Once this is painted and the lawns have been laid, an alley way will be built next to the houses as well as the car park for the station.
The terraced houses and gardens ready for painting.

The garden on the right has paving slabs and a path that will run down through the lawn.  The mini has been left in the middle of the station car park.

The buffer stop (Ilfracombe) end of the layout.  Showing the position of the terraced houses and a visit from a large logo class 47.

Looking towards the station.

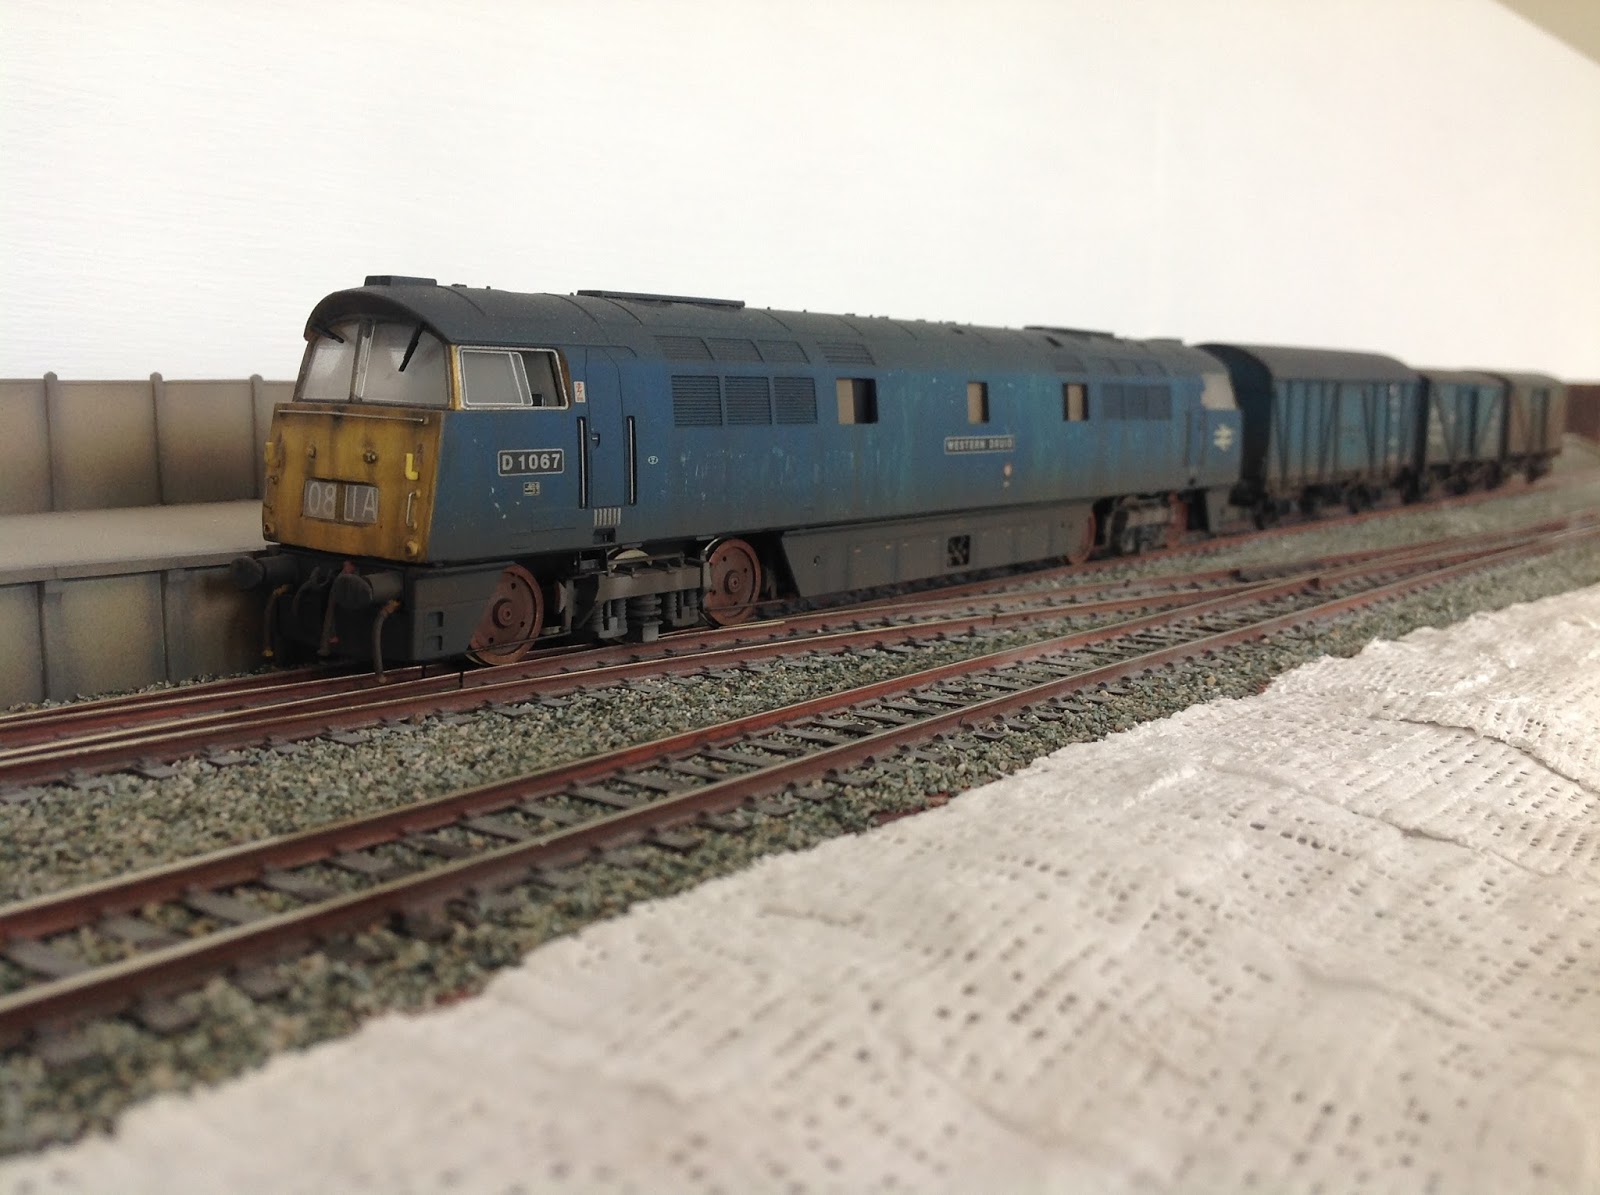
As well as undertaking some sporadic detailing, I have of course been running some trains - the fun part!  I got out some BR large logo locomotives, being a class 47 and 50.  I have also been playing around with running some DMUs and of course an obligatory parcels train with some of the recently finished wagons behind the Western with sound blaring out!
Parcels train arriving into the station.

Class 47 rescuing a failed class 50 at the station.  This is definitely the power of DCC, with the lights adding a further dimension to the model.

Sunday, 25 February 2018

Charlton micro layout - further progress

This week I finally managed to solder up the powerbus for the fiddle yard and give the layout a test run.  I have previously sound chipped a number of locomotives and I wanted to see how the layout would sound with 3 sound chipped locomotives running together.  The answer was very noisy - probably prototypically so, but a little bit too much for me! There were some definite outcomes from the running session.  The first of which the fiddle yard is too small, which necessitates excessive handling of locomotives and stock. This is fine when I am playing around at home, but definitely won't work if I am exhibiting the layout.  So the fiddle yard is going to a get a 1ft extension.  The second outcome is that two locomotives and two DMUs will be sufficient to happily operate the layout.  The stock will very between early 1970s and early 1980s, but say a warship and a class 22 plus a 108 and 121 DMU will keep the movements pretty varied.  However, to achieve this the fiddle yard is way to small!


Plenty of noise on the layout!

On the layout detailing side the station platform has been glued down.  Two buffer stops have been added at the Ilfracombe side of the station (it is a truncated branch) and the manual point levers have been added.  With these in place the ballasting has started - one of the most tedious jobs of railway modelling without doubt!  However all progress and it is starting to come together (starting!).

One of the manual point levers installed and ballasting started.

The Ilfracombe end of the layout with buffer stops installed.

Sunday, 18 February 2018

Station Progress part 2 - Charlton platform

Another week flies by and a bit more progress has been made on the layout over the weekend.  The fiddle yard has been tacked down and the dropper feeds soldered to the underside of the track, although I have yet to attach it all to the powerbus.  There are two medium sized electrofrog points in the fiddle yard that are operated by hand.  In the end I settled on a 3 lane fiddle yard.  It is big enough to hold a two coach train (minus locomotive which sites over the points!) or 2 car dmu, a 121 unit/spare locomotive and a short freight working.  I am hoping this will be enough to keep the layout ticking over at an exhibition, where I ultimately hope this will head.

The very short 3 lane fiddle yard

Finally I have finished painting the back scene, which seemed to take ages.  In the end a blast of matt white white from an aerosol did the job, to create an opaque finish. I have also made a lot of progress with painting the station.  The main painting has been finished, although there is some detail to pick out here and there, such as the stairs leading to the station.  Various shades of grey, green, black, concrete and rust were sprayed over the station, producing a very pleasing dappled colour to the concrete.  I did wonder if it was too dark, but the photographs seem to show it slightly lighter than it appeared when painting it.  Some of the platform will have some static grass applied to it, to depict a forlorn 1970s-1980s feel.

Overall view of the station

With the back scene finished I just need to finish scribing the cobbles (a tedious job!!) and then I can glue the main buildings down.  The station in particular is key, as once this and provender store are glued in place I can make a start on the ballasting.  The current plan is to finish the station this week and glue it down, to allow ballasting to start in earnest next week.  The layout is on the verge of the exciting stuff happening, when it transforms from a empty baseboard into a layout - it feels like it has been a long time coming! However, the electrics seem pretty solid to me, so I am hoping it will have a long and trouble free life (famous last words!!!!!!)

View from the provender side

The steps leading to the station require a bit of painting by hand

Thursday, 8 February 2018

Lamprey wagon - repaint

Recently I finished another wagon for the layout - this time it was a repaint of a very old lamprey wagon, that I built about 12 years ago.  At that time I did not have an air brush and I was not happy with the result through painting by hand.  So I placed the lamprey wagon, a class 25 body shell and a walrus wagon into a bath of superstrip to remove the paint.  The class 25 and lamprey wagon faired pretty well.  They have cleaned up ok and the class 25 is about to get a coat of primer.  However, the walrus wagon pretty much disintegrated into the superstrip - the plastic became very fragile, and when I was cleaning it up I broke so many parts of it that I ended up binning it.  
 The finished lamprey wagon sat on a very empty layout!


Once the lamprey was out of the superstrip I cleaned it up a little with some fine sand paper, before priming (Precision Paints) and then airbrushing various shades of rust and olive green onto the body, with various weathering on the underframe.  Transfers are the excellent Cambridge Custom Transfers pack and it is fitted with a 3 link coupling as standard.  When I built this wagon originally I cheated slightly with the bending of the hand rails at each end, creating a simpler shape, and with hindsight I now wish I had thought to replace them before painting.  However, I forgot, so I am going to live with this for the time being.  So another wagon finished and ready to run on the lay out...speaking of which a further update on this soon....