Pages

Sunday 25 December 2011

Weathering and airbrushes - a class 37, 47 and 03


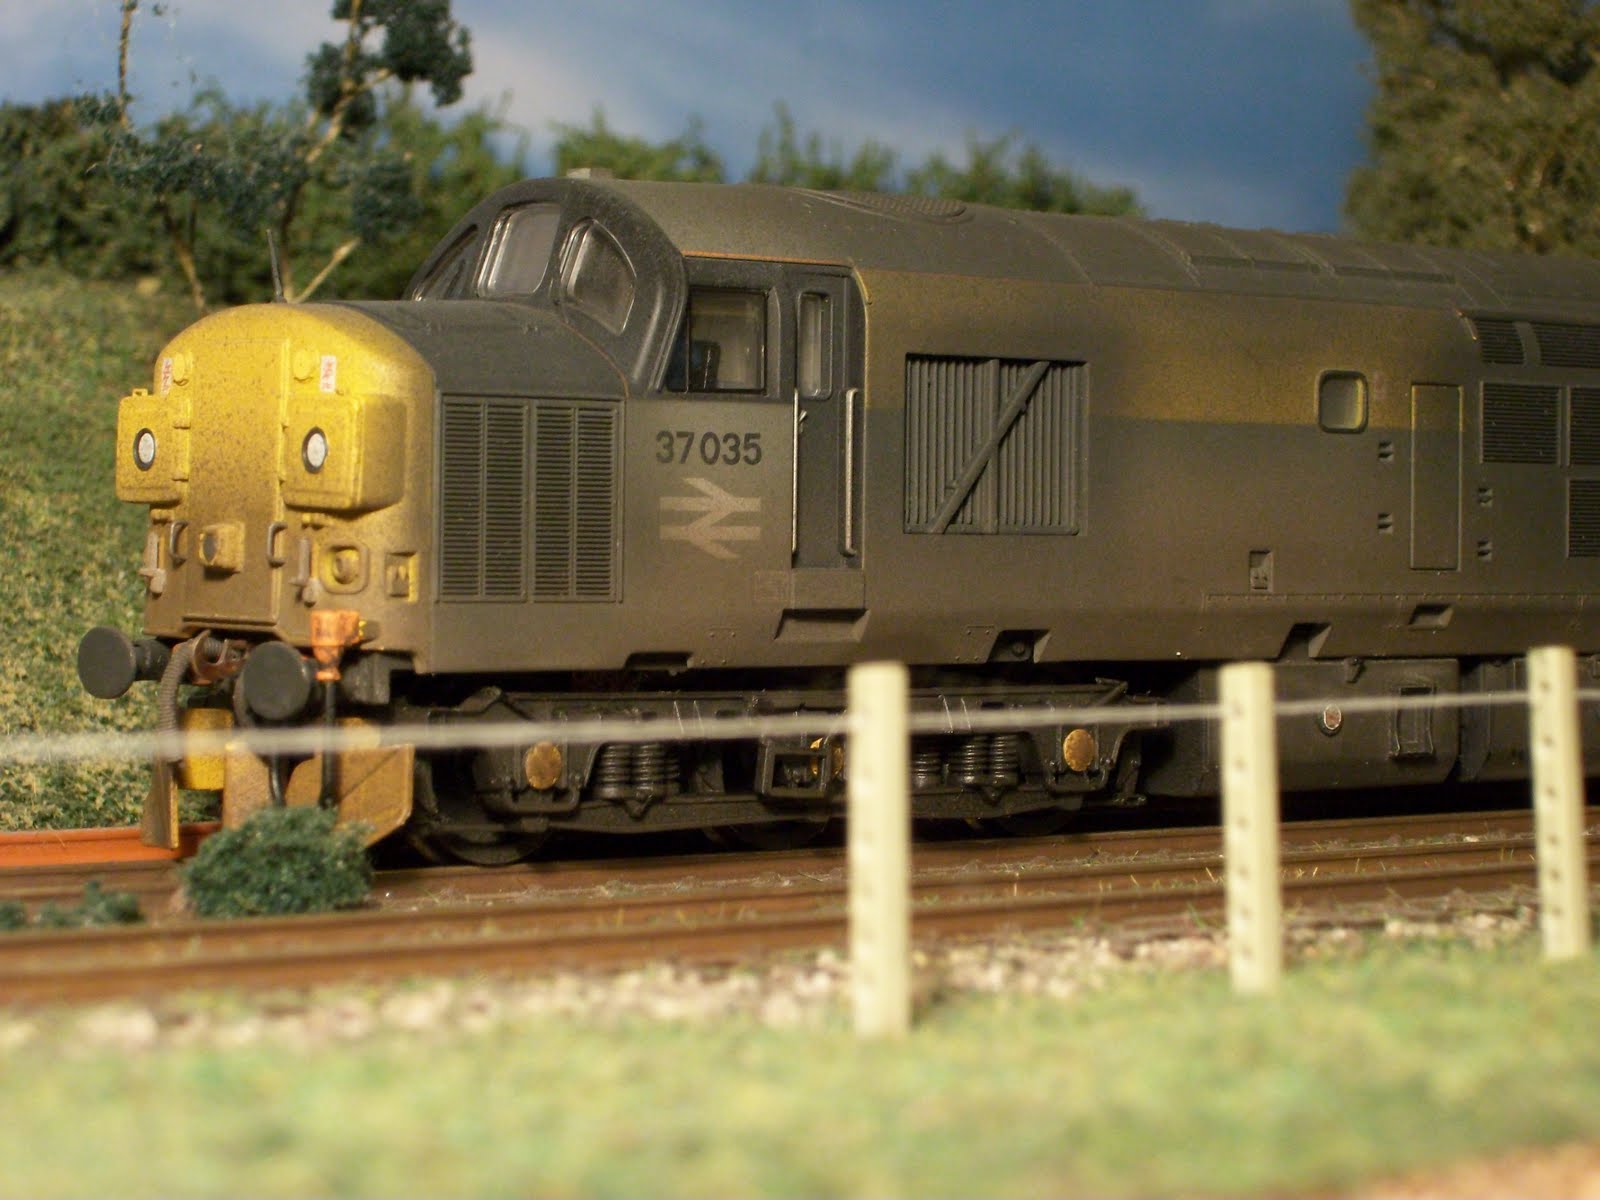
One of my first attempts at weathering, a dutch liveried class 37.

Santa has been very kind to me this year and I got a book I asked for that will help me with weathering and air brushing. I have had my air brush for a year now and it has been a fun learning curve. Maybe I should have read more to start with....and I have made plenty of mistakes along the way, but I am enjoying the journey. However, the quality of the finish is increasing with greater experience...but some of the earlier attempts I am now less pleased with. I also got a new Bachmann weathered class 25 for xmas, and the comparison of this with some of my earlier attempts at weathering, I thought, would be interesting. This blog has always been about my attempts at modelling, which is something I enjoy, but do not take too seriously.


The body sides on the class 47 are much better, but the weathering on the solebars needs further attention

The class 37 was the first or second attempt at weathering a locomotive. At the time I was over the moon with the finish. Some time and distance gave a little bit of objectivity to viewing the end result and it was quickly taken back into the paintshop. The end results is ok. I like it because it is a first attempt. But the spray is too blotchy over the body - a product of a blocked air brush, something I did not notice at the time, due to inexperience.


The class 47 I originally painted by hand. I washed it off and reweathered the factory finished livery using the airbrush. The roof and the body sides I am pretty happy with. The solebars look awful and now that I notice them, they have to get a full strip and repaint next year. The class 03 I was and am happy with the end product. It is still not perfect, but it is better again than the last. More time was taken, more coats and a better ability to mix paints.


The weathering of the 03 is a much later project and I think the result i much better

Which brings me to the Bachmann class 25. The factory weathered finish is multi-tonal and is better than previous offerings. However, I still think it is a pretty unrealistic finish. I wanted to buy it to compare with the finishes I am producing, and also to use it as a basis of a more detailed weathering job. Do not get me wrong, I think it is great that Bachmann are trying to produce more detailed weathered finishes. But given the comparison, I am going to stick with producing my own finishes. Nothing beats individuality and I am going down the path of buying cheaper locomotives (bargains!!) with the aim of detailing and weathering them. It seems less worrying to have a bash at a bargain, rather than a more expensive model!!


A Bachmann class 25 with a weathered factory finish......

I have a lot of good projects on the go at the moment, not least a 33/2 about to enter the paintshop, and a class 45. I intend to mess both of these up quite heavily. I hope to have some further results to show on this blog soon.

Merry Xmas

Hello one and all,

Wishing everyone a merry christmas and a happpy new year

Thursday 22 December 2011

Tunny nearing completion

The last week has been manic. Finishing off work for the xmas break, having to do the xmas shopping, and of course plenty of festive socialising has seen modelling placed well and truly of the back burner. However, work is now finished and I am hoping that tomorrow will see the end of the xmas shopping. I am planning a trip to Taw Valley Models to pick up some bits and bobs early in the morning. And then I plan to crack on with some modelling.


The partly painted tunny

One little project which received a little attention tonight was the tunny wagon. This is the chivers finelines kit, and is now largely painted. It is going to get a coast varnish to seal it, but then I need to wait for some transfers......it is so frustrating that getting transfers is such an issue at the moment. I can only hope that modelmaster decals final sort out their supply issues soon.


Just waiting for the transfers.......

The painting of the wagon was with lifecolour acrylics. It must have taken at least 10 coats of various colours to get the wagon to this stage. I intend to weather over the top of the transfers, so there will be a lot more grime to add this yet. I subsequently decided to buy another 3 of these wagons, one southern and two GWR types, for my rapidly growing engineering stock department. However, it seems that getting hold of the chivers finelines wagons is now just about impossible as well. This is really annoying as the chivers kits are excellent and I sincerely hope they will be available again soon. In the meantime I am scouring e-bay.

On other fronts and on a more positive note, the lighting kit turned up for the class 121 today from Express models. This project I now hope to finish over the xmas break..... fingers crossed

Saturday 17 December 2011

Pottington Quay warehouse finished..


The finished warehouse on Pottington Quay, in its final location

This week and weekend I had plans of getting the track laid on Pottington Quay and the backsecene sprayed. Events have transpired and I am now stuck in the office writing up reports, all over the weekend. Luckily I enjoy my job, so it is not too much of a chore, but it does mean that I I am not going to get Pottington Quay operational by xmas, which was my plan.


The class 33/2 emerges from behind the warehouse

However, I did manage to finish the warehouse for Pottington Quay this week. This is my first attempt at scratch building anything. Stupidly, I have decided to plonk the building right at the front of the layout, as a scenic break for the trains entering/leaving the shunting micro. This means the building is up close to the edge of the layout and very visible. As a first scratch building attempt, it has turned out ok, but not perfect. However, it is all a learning curve, and I am sure I can blend the less than ideal bits in with some strategically placed scenic items!


I hope the scale appears about right....

Whilst I had the warehouse on the layout to see what it would look like in place, I also got out a class 33/2, which was about to get dismantled ready for detailing and weathering. The 33 was placed next to the warehouse on the track, to see if the scale was about right. When I built the warehouse I guessed all the dimensions, with an ethos of 'I think it looks about right'. I think the relative scales work, although they are obviously none exact.

So there it is, my first finished building for Pottington, and a unique one at that, a first for me! Over the xmas break I am going to get some modelling clay, to have a second attempt at scratch building something with my son, maybe a second building for Pottington Quay. Until then I have the 33/2 in pieces on my work bench, with the sideframes/bufferbeams/interior cabs, etc, all removed, and the same for a class 121 and class 25. So I have plenty to be getting on with and its only a week till xmas.....

Sunday 11 December 2011

A Trout in North Devon


Weathered Trout, on Amberleigh

Another engineering wagon goes through the paintshop. This is the new olive trout from Hornby. This is a great wagon, with lovely moulded detail and bang in the range of mid 1970s - 1980s that I am interested in. Although I believe from the review in Model Rail they a bit eastern dominated in their distribution, I am having a small number of these to potter around my imaginary North Devon layout.


The wagon was weathered with Lifecolour acrylics and some Tenscrom Lifecolour rust. Various shades of rust, weathered black, sleeper grime and frame dirt where sprayed over the hopper body and underframe. Overall, I am pretty happy with how this one turned out, and also a quick little project to boot. Think I am going to get another one asap!! The next trout is going to get a super heavy rust finish to mimic a wagon right at the end of its working life.


The warship creeps into shot on Amberleigh, with the finished trout on the layout

I also picked up a DCC fitted Warship in rail blue at the weekend. Given the shortage of 21 pin decoders around at the moment, this was great to get a locomotive ready to use on Amberleigh with a decoder pre-fitted. The warship, the class 33/2 and the class 45 are projects I really want to get moving, although the class 121 continues to make progress. My son and I have also managed some landscaping on Pottington Quay and I have almost finished the warehouse for the front of the layout. Nearly, because this evening I painted one of the doors which was covered in hair and dust (how did this happpen??). So this needs to be sanded off and repainted tomorrow night. Hopefully Pottington Quay will have the track laid and wired up the week after next, so there might be some serious progress on Pottington Quay before xmas.

Tuesday 6 December 2011

A cambrian whale wagon

I have been trying to regain some impetus on some of my stalled modelling projects recently. The biggest cause for stagnation on these projects is the lack of suitable decals from model master. However, I am led to believe that December will see an end to the supply issue of these transfers, so with this in mind, I picked up my partially completed whale wagon at the weekend.


Whale wagon nearing completion

Having time away from a project is no bad thing. A little distance will often give a little more objectivity. On picking up the whale the first thing I wanted to get rid of was the the canopies on the platforms - the original ones I had made looked pretty rubbish!! With this is mind I had purchased some A1 models mesh guards.


The canopy detail, with the metal handwheels making a substantial difference to the appearance of the wagon

Admittedly on Sunday morning I had a pretty bad hangover, but the replacing of the canopies took all day. The A1 models canopies are the wrong shape, having square struts, rather than round ones. So in the end I bent some new struts from 0.45mm wire and glued the mesh from the A1 canopies on the bent wire, after cutting off the square supports. There was quite a lot of swearing whilst doing this - a combination of a fiddly task and a bad headache!


The updated canopies are much better. After I had completed this I noticed some imperfections on the moulding of the body sides, so this was sanded off, before handwheels (Nainshire Modelling supplies), and the rest of the underframe details were added. The whale was given another good wash in the sink and is now waiting to be have its paint job finished.


The large white mark on the wagon was a moulding imperfection I have only just noticed which required sanding down.

I think I am improving on each of these large hopper wagons I build. The first walrus was not so good, the second was much better, and this is an improvement again. I have another whale and walrus in the kit box and the construction of these is imminent. Hopefully, it won't be too long until I finish one of these wagons that I am totally happy with....!

Saturday 3 December 2011

A little warehouse painting

I have managed to get a little further with the warehouse for Pottington Quay. The progress has revolved around painting, and it has been a little bit of a learning curve. First of all I painted the building sides in a bath stone type colour, a light orange/yellow/brown. The local slate and shale is a yellow/orange/grey, so it is a reasonable approximation.


Photo 1: The body of the warehouse was painted in an orange/brown yellow mix and then weathered with washes of acrylic white and black.

After this is ran a diluted acrylic wash of white, then black over the stone work. The result of this is photo 1. The overall effect was a little too dark for me. So I dipped several cotton wool buds into a water based air brush cleaning solution and rubbed the building sides down, paying particular attention to where water would run down the building sides, such as off window lintels, etc. This is shown in photos 2 and 3.


Photo 2: To lighten the overall effect, I washed away some of the black paint with air brush cleaner on a cotton wool bud

The effect is better, but not quite perfect, but then again neither is the building construction!! I still have to paint the window lintels, guttering,doors and window frames, and then attempt to blend these elements in. However, it is getting there and it is a great learning experience. It should get finished this week......

But right now I am about to get distracted by setting up my test track Amberleigh and playing with the class 25/3 DCC sound bachmann locomotive that has been long awaited but has recently arrived....


Photo 3: Note the cleaner area beneath the window lintels to mimic water run off